


tulanejp
-
Posts
38 -
Joined
-
Last visited
Content Type
Profiles
Forums
Events
Gallery
Store
Posts posted by tulanejp
-
-
I usually just beat them out through the bottom with a hammer and press them back in. Can you post a pic of the tool you got?
Hey dude. Thanks for responding. Here's a pic of the tool.
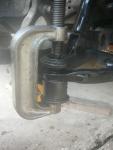
Here's a pic of the tool with the medium cup fitted. See how it looks like the lip of the ball joint goes out to the edge of the control arm.

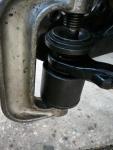
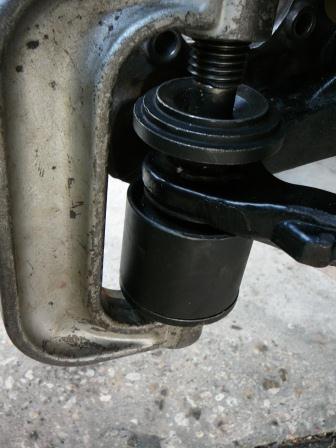
Here's a pic of the large cup that hangs over the outer edge of the control arm. That doesn't look safe, but may be the way to go.

-
Hey all. Never tried this before, but decided what the hell? I'm trying to press out the stock lower ball joint on my 04 SS. First question is about the crimps on the stock ball joint. The whole lip, all the way round the top of the ball joint, doesn't need to be bent back right, just the 4 crimp marks? Second question is about setting up the press I got from Autozone. There are 3 cup sizes. The middle one fits right over the grease boot, but I can't tell if it's still on the underside of the ball joint or on the control arm as it should be? That is, it seems like the underside of the ball joint, the shoulder of it, comes all the way out to the edge of the control arm on the front 180 degrees. So, I'm wondering if the press I have will do the job?
-
Looking for 4 wheel cener caps for stock 20" painted rims - not chrome. If anyone has some laying around and wants to dump them, PM me. Thanks.
-
Ok. Disconnecting the battery cleared the code. Thanks for the help! ... Now, I guess I'll ebay the universal. In case anybody is looking at this particular one, I don't think it fits this truck even though it was listed on the fitment chart of the website I got it from. It's a USOS-4000 made by US Autoparts network. It's got 2 white wires, a black and a grey whereas the truck has a white/tan and white/purple, brown and pink. The service manual says all four wires service four different circuits, so the question will be, if one is going to try to make this work, which white replacement wire goes to which OE white wire? Regarding the other two wires, best guess from the installation instructions is brown->grey, pink->black. Anyway, probably flat just doesn't fit. Hope this helps somebody!
-
Ok. I'll try disconnecting the battery. ... Fireman, yeah, I thought that the sensor may be fouled now since it's been essentially disconnected for a couple of weeks. Bought a universal since I plan on changing all 4 in 30k miles or so (just wanted a stopgap). The question came up because the service manual is kind of vague. It lists different types of sensors that will clear themselves and some that won't, and IIRC, there was the category that these sensors fell in which was like a "might or might not" category. In any case, I'll try the battery first, and if not, if I can figure out how to wire the universal, I'll post that info and results. Thanks for the responses.
-
Hey. I've looked around a bit for this answer, but can't find exactly what I'm looking for. My truck set the p0141 code for the O2 sensor bank 1, sensor 2. Well, I took a look at it, and it looks like the wiring harness came free and got chewed up by the front drive shaft. I've crimped in some new pieces of wire to reattach the connector to the wiring harness, but the CEL is still on. I'm wondering if I need to have the code cleared with a scan tool, or if it's supposed to clear itself when the condition is gone (i.e. there is still a problem). Anybody have an idea?
TIA,
JP
-
Hey. Interesting tips. Any tips for removing stubborn bugs?
-
Ok. Got a couple of people interested via PMs. Give me till early next week to follow through on these. Thanks for the responses.
JP
Ok. The two rims with road rash are sold. The one that's really damaged, but can still hold a tire, is still available. Make an offer, but I'll sell that one for next to nothing in case anyone is interested. More pics. Don't know if this distinction will be useful. The lip of that rim is bent, but the rim isn't warped as far as I can tell.
I've also still got a pristine silver rim for $150. That includes a center cap, and the rubber valve stem is still on the rim.
-
Ok. Got a couple of people interested via PMs. Give me till early next week to follow through on these. Thanks for the responses.
JP
-
-bump-
These rims are still for sale. The only change I want to make is to up the charge for the best-of-the-worst rim to $50 for it. Looking at it, it's in pretty good shape. I really want to dump all three, so they're still available for $75 for all three including center caps. Surely, someone either does rim restores or would like a 20" spare. Also, the pristine one with center cap is for sale for $150.
Any takers?
-
Looking forward to seeing the write-up. I wanted to do this just for fun, but according to a guy in this thread, the light bulbs aren't accessible in the manual setup. So, this is looking more like a nice repair/upgrade (to fix broken A/C control lights). Thanks again.

-
... Yes you already replaced the alternator, but have it tested again, you never know the new one could be bad too. ...
 This is a little off topic, but this is a lesson I learned the hard way. Now, I always have batteries, etc. tested when I buy from Autozone, PepBoys, etc. before I pay for them. A few years ago, I went through every battery on the shelf, of the model I was buying, until I found one that tested as OK according to their tester.
 -
I've got a similar problem on a manual HVAC setup. The dealer said the whole control has to be changed to fix it. Here's a thread to keep an eye on blue led post. It's discussing changing the back lights to blue leds.
-
Great write up! I get some really good ideas from this site. Unfortunately, I don't get around to taking as good care of my truck as most people around here do, so I'm constantly battling bugs on the nose of the truck. The other day, I went out after a heavy rain and found them much easier to remove. I've tried quite a few bug removers (now I'm using some blue stuff a detailer gave me), but none of them work particularly well. I wouldn't call this a tip, but at least an idea at this point.
I'm one of those that washes and dries piece-meal instead of all at once. It's so hot down here, the soap dries after I've moved down a panel or two. I'm wondering now if that really matters? I wonder if that water sheeting trick, with the hose without the nozzle, will remove the dried soap and particles...

-
I know there was a GM TSB for a whinning noise from power steering rack when turning left or right in the 2003-2004 model year trucks/SUV's. GM replaced my steering rack with a new design on my 2001 GMC Sierra 4X2 back in 2003 under warranty, and the NOISE went away. Something to do with a defective fluid orfice or such at one of the GM plants that made the steering racks for a certain time period. That's that AUW HIG PRICED labor kicking in I guess. LOL!!

Hey. That reminds me, does anyone know of a website/database that has all the TSBs for our trucks? Unfortunately, mine is out of warranty now, but I always wanted to see what advisories had been issued. The case above particularly burns me up because my truck used to do this and the dealers said they "couldn't reproduce the issue". Yeah, right, but anyway, if I had known about the TSB, I'd have had some extra ammo!
 TIA for any help.
JP
-
Here are some suggestions. Try another dealer first. If all else fails, call Chevy customer service before the warranty ends - and document everything. I've had luck with them though they made me jump through many hoops - i.e. calling them back, rehashing the whole story a few times, etc. In the end, I got a service credit out of Chevy.
-
im also intersested in all 4 of them just let me kno thanks
Will do. I'm waiting on two other people. I'll let you know.
Thanks,
JP
-
interested. whats shipping to 15136
Looks like about $32/rim for USPS from 70119 to 15136 - no insurance, no extra services. Just whipped out the scale and it looks like the rims are about 38lbs, so I'm guessing the boxes are going to be around 45lbs with dimensions around 21x21x11. I'm not looking to make money on shipping, but I won't know the exact weight and shipping until the boxes are built. Use these figures to estimate the shipping elsewhere.
-
Hey there. I'm cleaning out the garage, so some of my longer term projects gotta go. I've got 3 silver, 20" GM rims off an 04 SS with road rash on them. One of the rims has a bend in the lip. The rest are just scratched up. I want $75 for all three, or $30 a piece for piecemeal. Even the one with the bend in the lip ran fine before being taken off the truck, but it should be repaired before going back on a truck. These come with center caps that have some crap on them (like dried glue or something).
Also, I've got a 4th rim, 20" silver, GM, that's used but pristine. I want $150 for that one. It comes with a clean center cap.
Anybody interested, let me know. I'll send more pictures. Here's pictures of the 3 damaged rims rim pics.
JP
-
This is so important I'm going to say it again -
On these trucks, if you are going to drive them any harder than say a Geo Metro then you've GOT to get rid of the Goodyears for a better set of tires and you've GOT to get at least a set of Baer Alumasport front brakes. I cannot stress this enough from personal experience, this is the FIRST mod I would encourage everyone to do. These factory brakes/tires will get you in trouble eventually, I am sure that more than a few others will agree with me on this from their experiences too.
Mr. P.
I agree, Mr. P. I'm at 47k miles and over the last 20k, the brakes have begun to basically fade, and I drive this thing pretty easy. Seemed like the stock rotors looked small behind those giant rims, but me thinks there's more to it. I really wish GM had used higher quality parts and better workmanship in what I thought was their flagship truck.  By the way, I switched the stock tires for some General UHPs around 30k ago to fix poor handling in the rain, and that did the trick.
 -
Replaced mine recently. Got about 3yrs/30k out of it. FYI When it died, I searched this forum. I thought I found a thread of people complaining of only getting 3yrs out of the stock battery.
By the way, found replacement batts at Sam's for a little less than $50 IIRC.


Help Pressing Out Lower Ball Joint
in Suspension & Brakes
Posted
Hey. Good tip. The large cup worked! Man, having half the cup not in contact with the control arm, with the pressure I was applying, I never would've thought it would hold up. But it did. I just figured it would slip or bend or something. Thanks again.
For anyone else wondering, making sure the press was inline with the center of axis of the ball joint seemed to be necessary. I did this with the control arm on the truck, so the setup was clumsy. Initially, the press slipped out of line a little and didn't press out the jont.