


kelleyperformance
-
Posts
2,831 -
Joined
-
Last visited
-
Days Won
6
Content Type
Profiles
Forums
Events
Gallery
Store
Posts posted by kelleyperformance
-
-
we hand made each letter, i can do most anything in SSS font

-
sounds all good to me. i can prob find someone to etch here if theres no one around you... i could also do this, i was thinking and its prob what im gunna do for my JGP:
- either use a decal like you got on there now, or mask by hand a design, logo or whatever youd want on the cover... stick it on a bare cover thats been lightly scuffed and prepped for paint already. then i could use my translucent light paint formula and spray the cover (anywhere from 85% visible light transfer / VLT to black looking...), in my case id do it medium, like smokey... then remove the decal/masking after final coat of translucent formula and clear the whole thing. this would leave the design/logo crystal clear. then id put 2-3 tiny single chip SMD LEDs in the bottom of the airbox hidden. this way it would have a faint glow through the whole cover, but mainly just shine through the design/logo. i think i may like this idea better than my first one lol... hmm...
-
i did just the tailgate, just like OEM. i designed these to replace the "silverado" on the tailgate, but many people run them on the sides of their cowl hood, under door emblems, etc etc. i can make you whatever color you want, but what i have in stock is the OEM gunmetal looking metallic color the stock "silverado" decal is colored in. i think there are pics of it on my truck on the first page isnt there?? i dunno if i have any others close up... ill look real quick tho
-
which sensors you replace, sensor 1 b1/2 or sensor 2 b1/2?? and is that a rear O2 in that picture of front?
DO NOT pull any front O2 sensors and drive the truck! what do you have for a tune? and yes the PCM is going to be compensating the mixture so dont worry about it in the mean time... first thing id do is check your engine/PCV system for vacuum leaks. next id remove the MAF, clean it with some MAF cleaner from the autoparts store. and if you replaced the front O2 sensors (b1/b2 sensor 1) then i wouldnt worry about those. guessing no cats?
-
TTT... i still have a bunch of these, every time i see one sitting on my desk i mean to open this thread back again for people who hadnt seen them or doesnt have a set yet. i personally love little touches like these

John
-
any pics of your door sills? sounds pretty cool. EL tape is awesome stuff is used right for sure
Haha yeah! Makes you stay up-to-date on your filter cleanings. Don't wanna have an ugly, dirty filter under your nice plexiglass cover. I really think a pre-filter will really make it look that much nicer. I am going to try to clear coat the plexiglass and then wet sand it. See if that helps protect it from scratches. (Got that idea from a buddy of mine). ;)
that will actually work great just make sure to use the proper plastic adhesion promoter, we like Bulldog. and i know this sounds like the last thing youd wanna do but, lightly LIGHTLY scuff it first, itll come out better that way and with the promoter will never chip or come off
-
well if they dont treat their dealers very well how do you think customers are handled?

-
nah brandon get the 26s, you got plenty of power itll be fine. shiiiiiiiiiiiiiiiiiiiiiiiiiiiiiiiiiiiiiiiiiiiiiiiiiiiiiiiiiiiiiiiiiiiiiiit youd be stuntin, stunt 101!

seriously tho, i always loved those wheels on Chris's truck (same truck in the pic u posted). and i have never seen the except on his truck, so you got that unique factor going
i spoke to him the other day, i know he still has the truck. maybe he has swapped wheels or may sell them. ill give him a shout and see for ya!John
-
Shit John, I'd buy one etched with the Vmax logo. Your ideas man, you are determined to make me a customer...
Sent from my DROID RAZR MAXX using Xparent Red Tapatalk 2
LOL im a persistent bastard i guess
-
Negative on that, it's legit......
what makes you sure of that? from all the experience i have with GM and being a dealer... theres no way theyd pay someone to go into a forum for a nearly 7 year out of production GM vehicle.
-
FYI- chances of this being real is slim...
-
Thanks man! Appreciate it!
you really should sell them, hell id take a few off your hands to keep in the shop for people
decal was a nice touch. what you should do, is see if we can find someone to etch them, and i have an LED setup in mind that would be hidden... when on, would only light up the part thats etched/frosted. kinda like the rear window on a big custom sport fish yacht. think that would look cool? it looks good in my head -
looks nice man, i always liked when people did this
-
Jesus dude... You really know your shit.. Ill talk to the builder a bit and see what he plans to use before he pulls the trigger. Ill print off your statement above, and your parts list. Haha i dont want him putting in outdated technology. Actually, if you could PM me a parts list that you recommend i put in my trans, id greatly appreciate it. Id hate to overlook something and have to have it redone a few weeks later.
not a problem brandon ill do that now
Haha thanks John. Only for now. When I get you slap the silly gas on it we shall see. Yr doing a great job man.
oh thats right i forgot... hmm thats gunna be an interesting race. hes got that 2600-2800 stall now tho, that should make a huge difference. hook up the shop GoPros!!


-
yeah lets see pics, those are nice guns
just bought/sold one a few weeks ago -
here are some more photos of LED conversions, and some i think have not been done before (not sure... but curious
 ) heres pics from a few different conversions, some pics of my JGP truck and my SSS truck inside as well. they are both not finished (shoe makers kids have no shoes ) cause im too busy doing all YOUR stuff all comments and suggestions welcome
will post more in separate post !
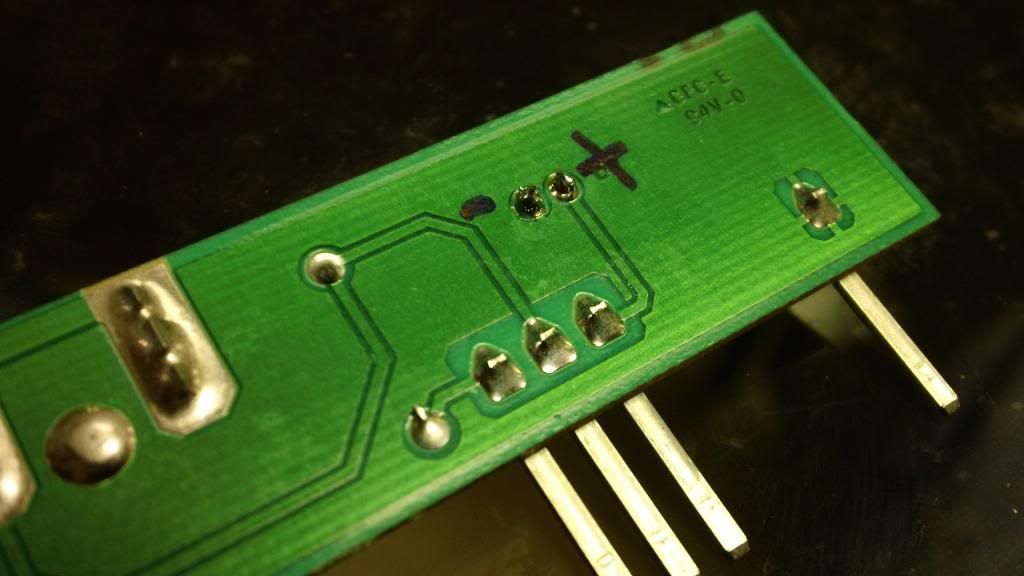
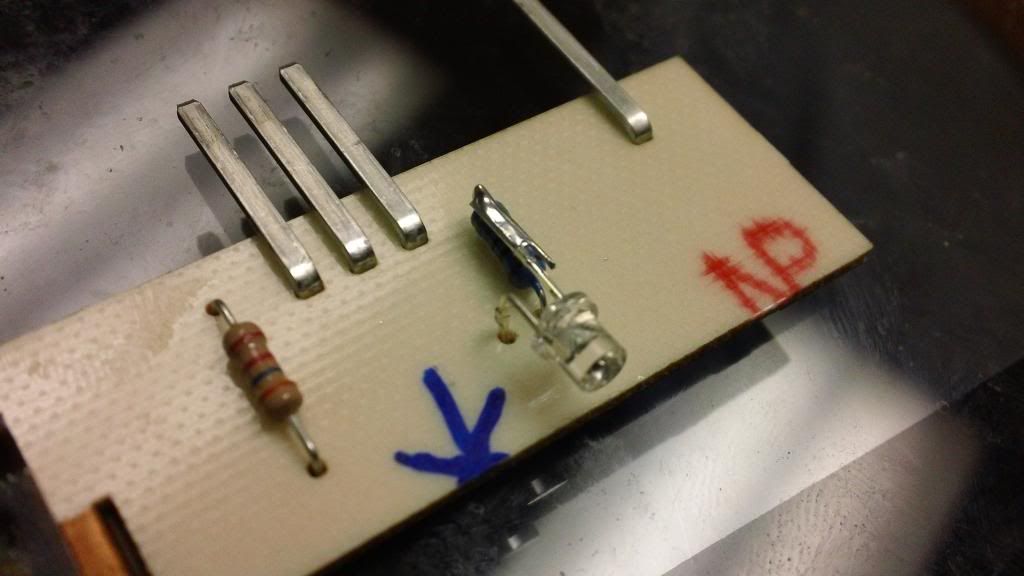
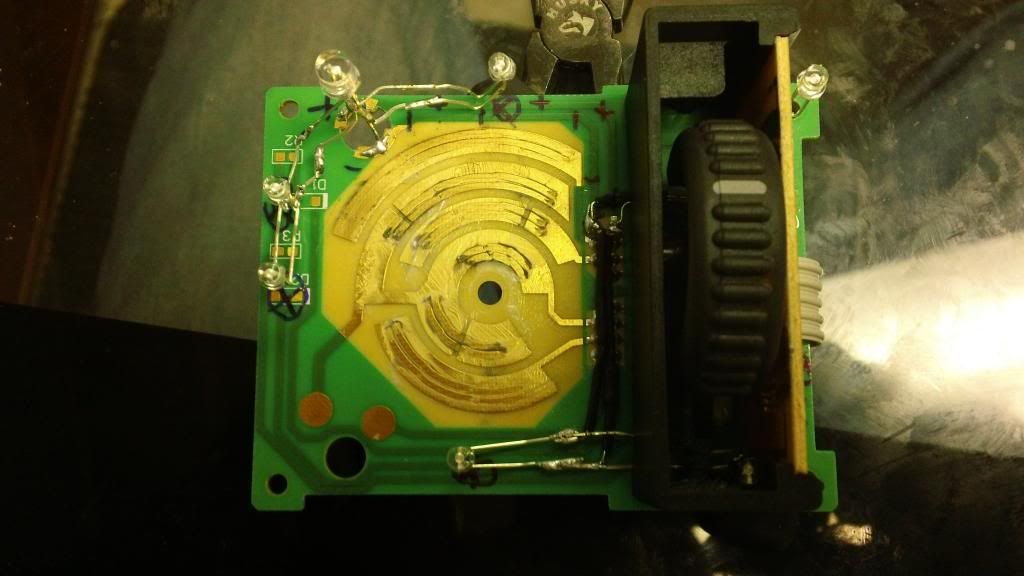
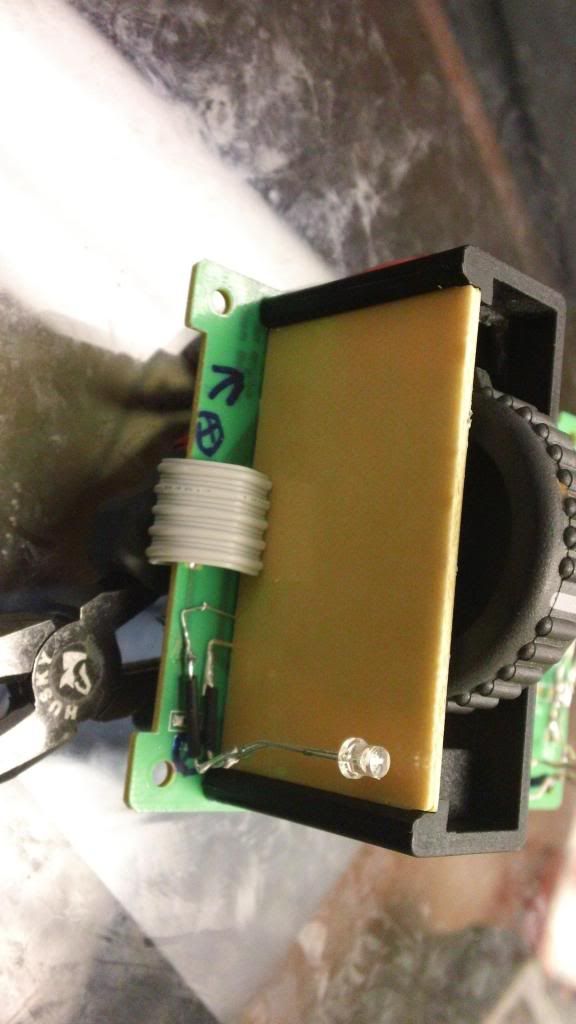
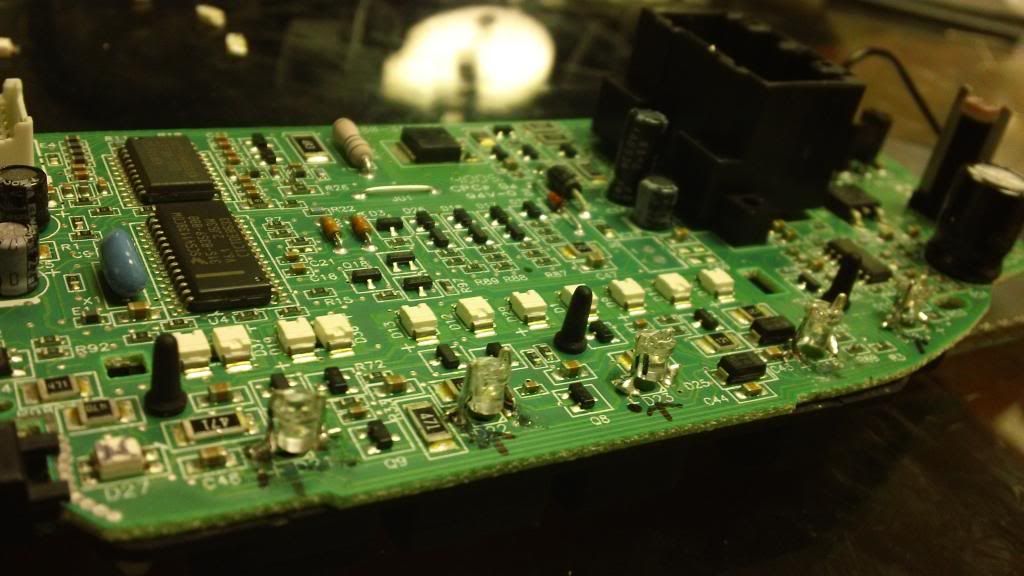
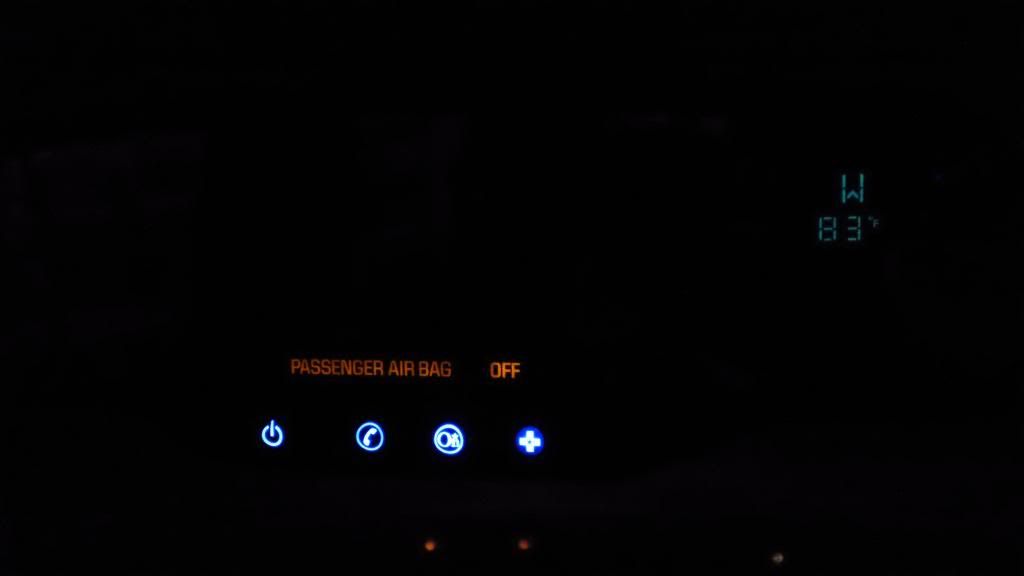
traction control unit (2wd):
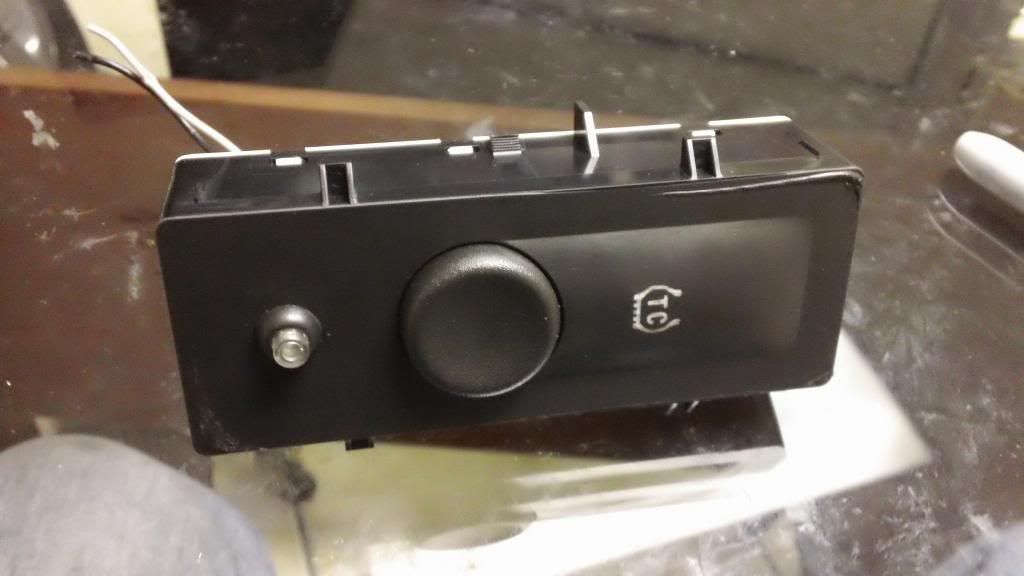
^that button/light is my N20 purge, its "hidden" in a way as it looks like an LED (which it is lol) but its also a button
 just stuck it there as it used to be where my fog light switch now is, when i didnt have fogs. thought it worked good here IMO
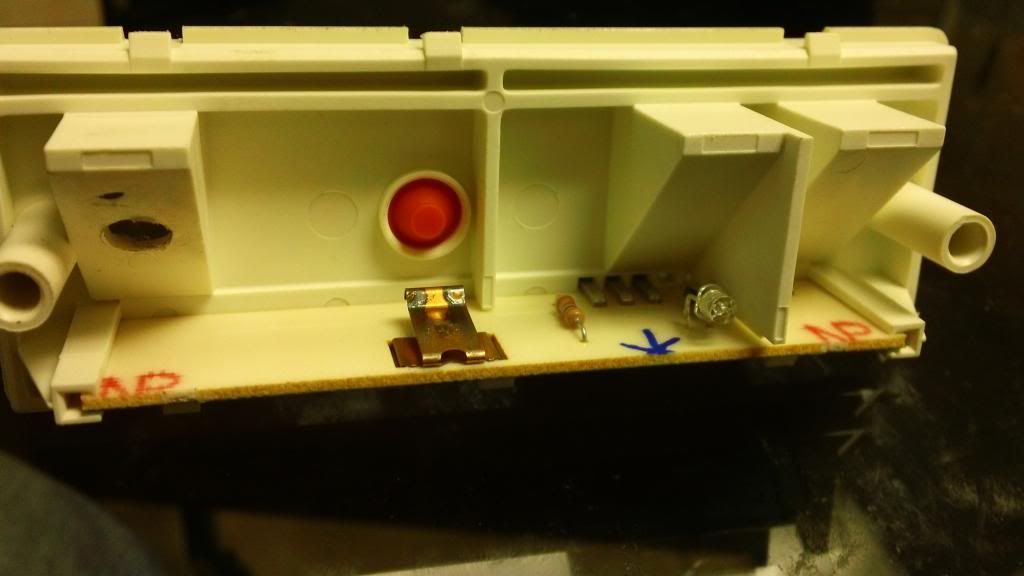
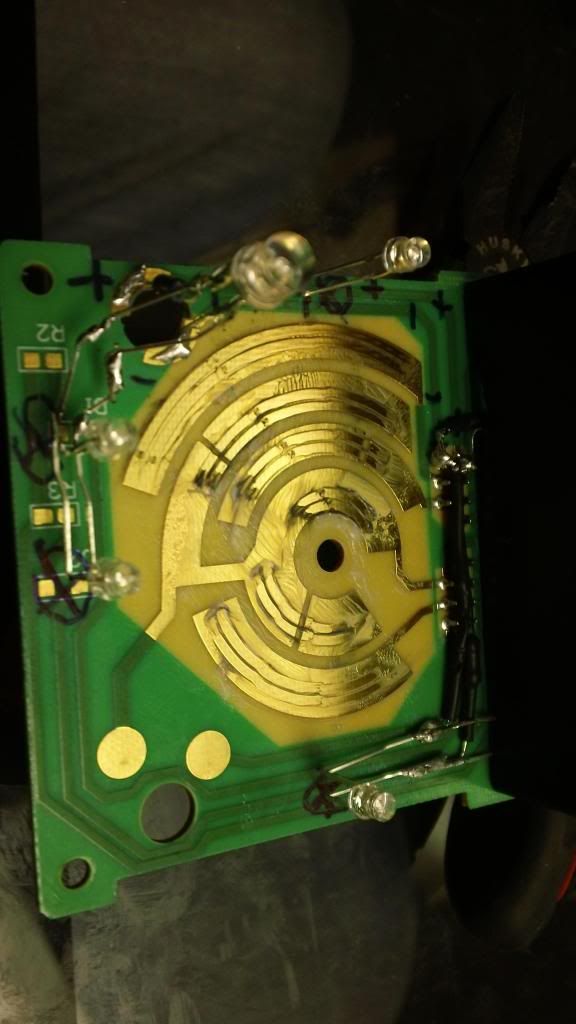
fog light/bed light switch:
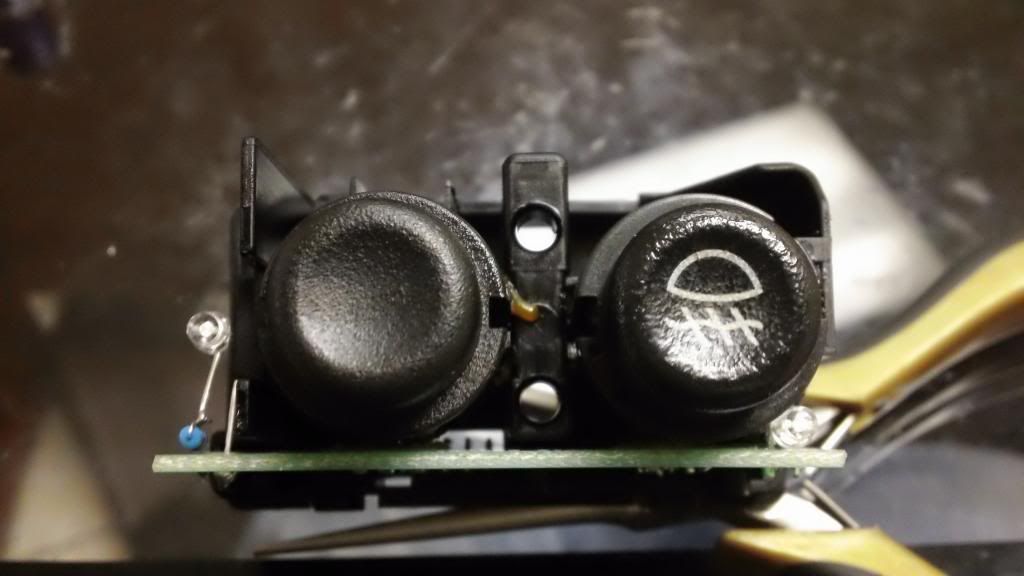
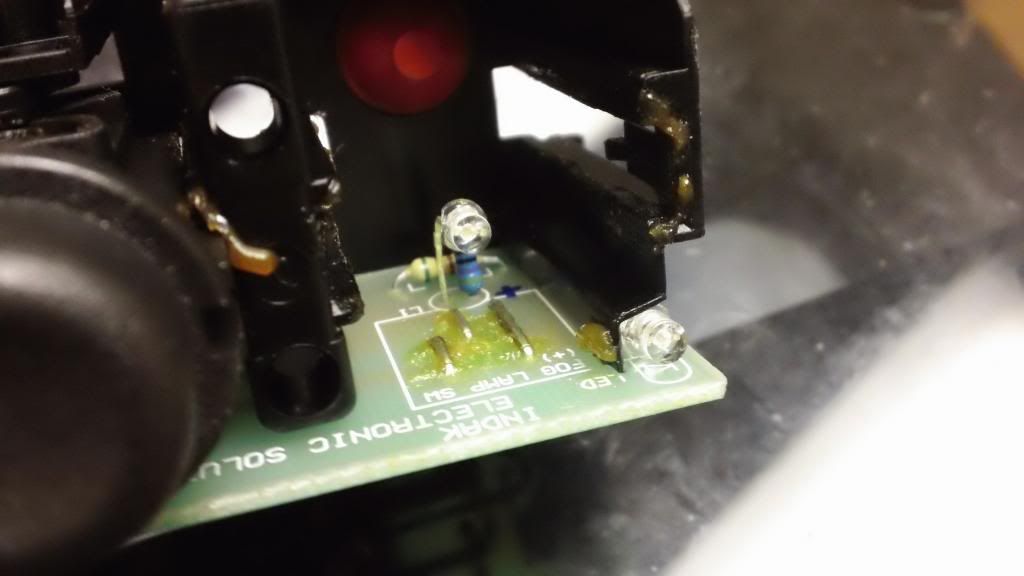
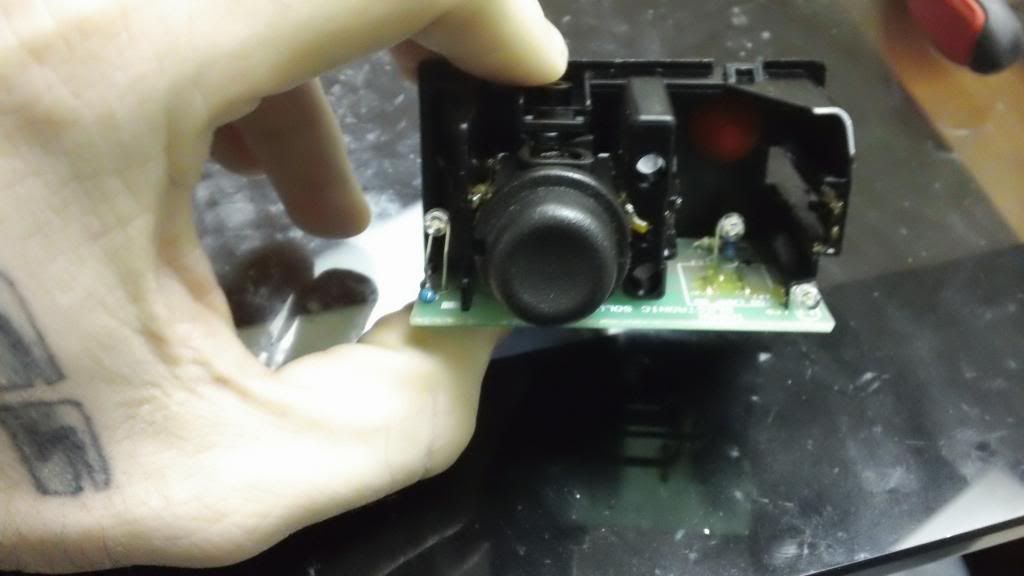
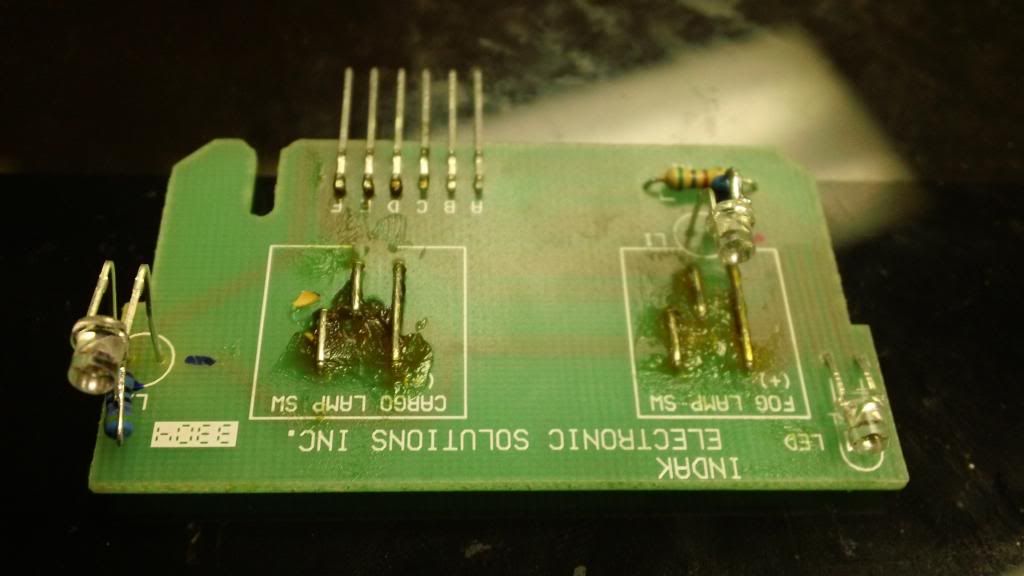
^i changed out the yellow status/indicator light on this unit to blue, NOTE: the resistor on the OEM yellow LED is on the NEGATIVE leg on the LED!!! you MUST install the LED backwards in this location! if you dont, it will ALWAYS be on as soon as you plug your fog module back in and will NOT come on properly. a lot of the OEM electronics work this way- constant 12v with switched ground
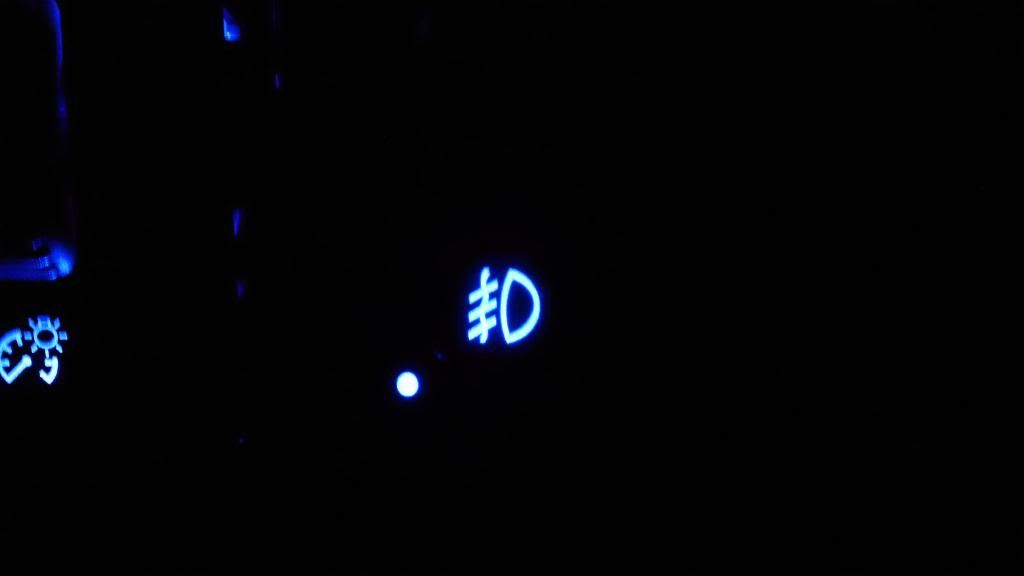
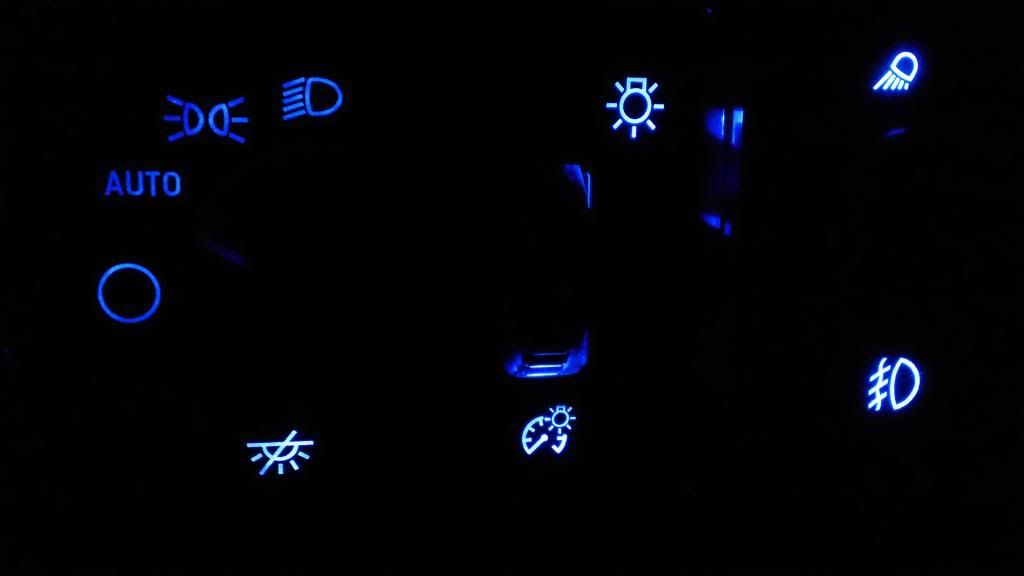
the infamous headlight switch
:
^NOTE: i used black laquer paint on the parts of the LED i did NOT want to emit light, as to limit the amount of "stray" light that escapes out of the dimmer switch hole- i hate this fact, that light comes out of the dimmer dial area- this limits the amount A LOT from my different "tests" (ask Alex
)
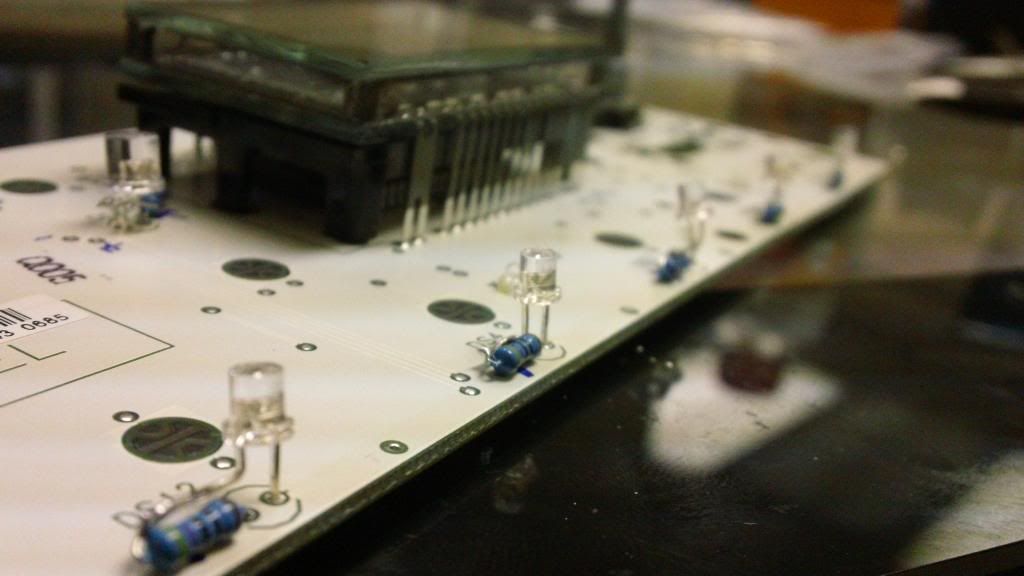
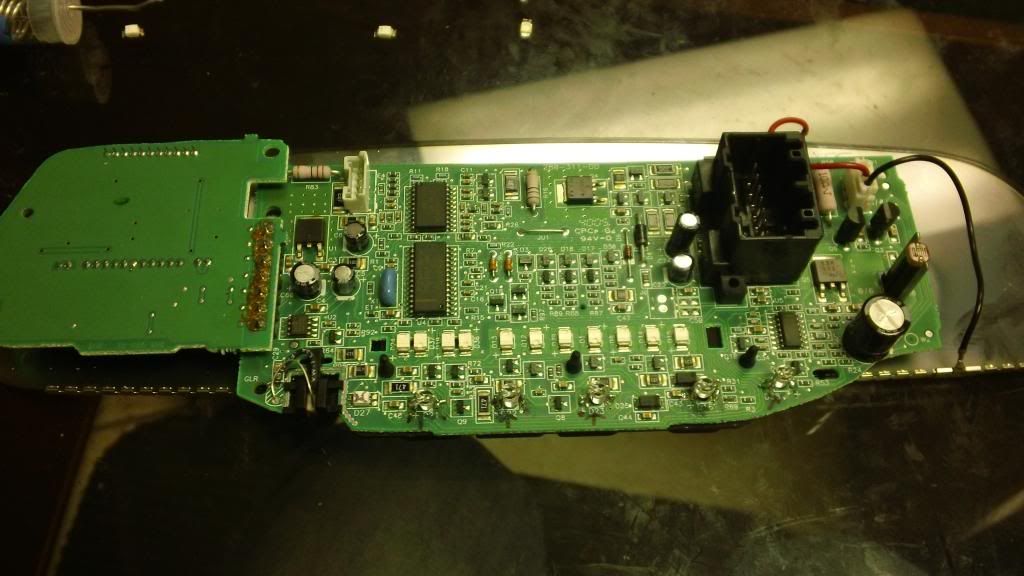
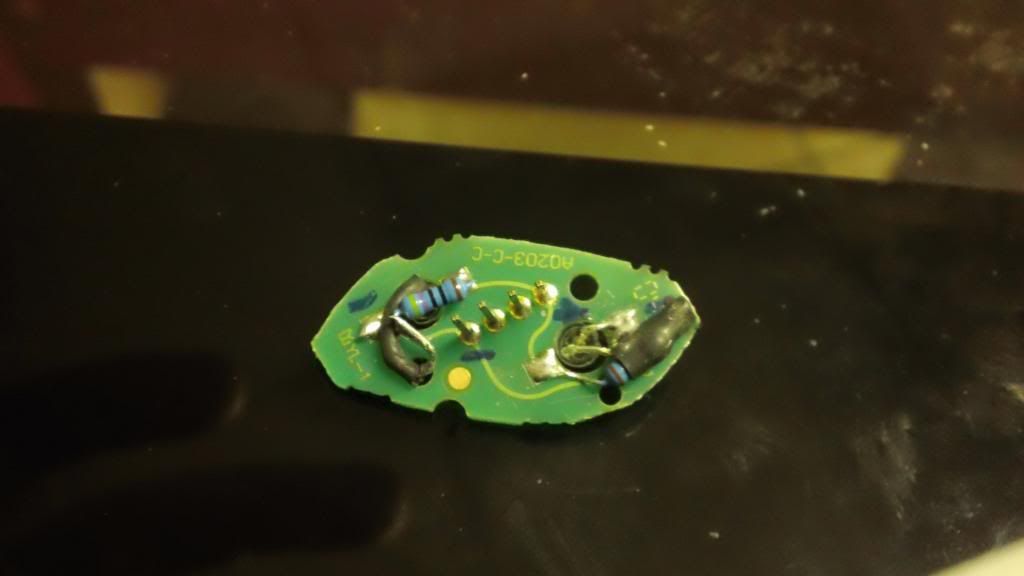
digi climate control unit:
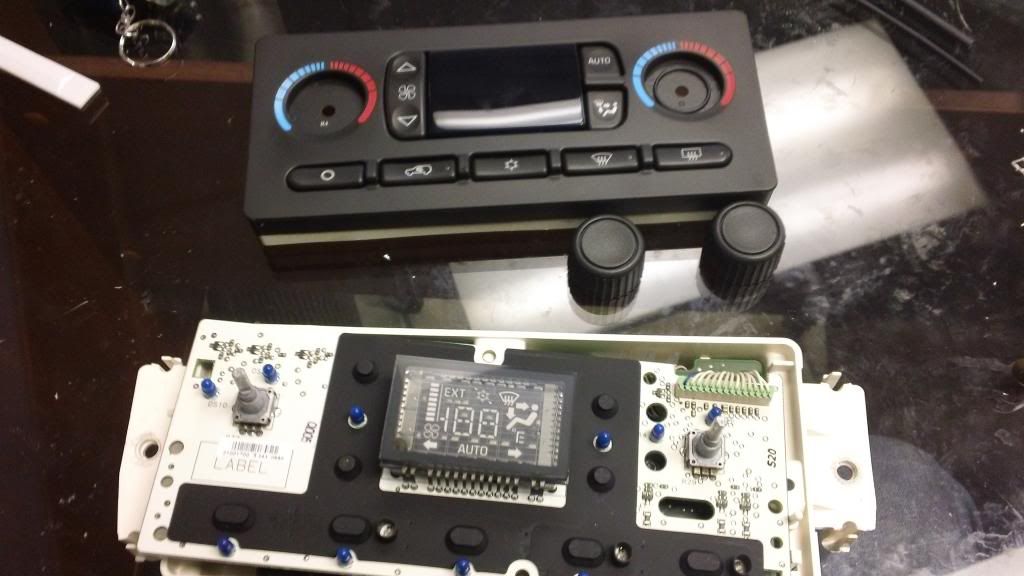

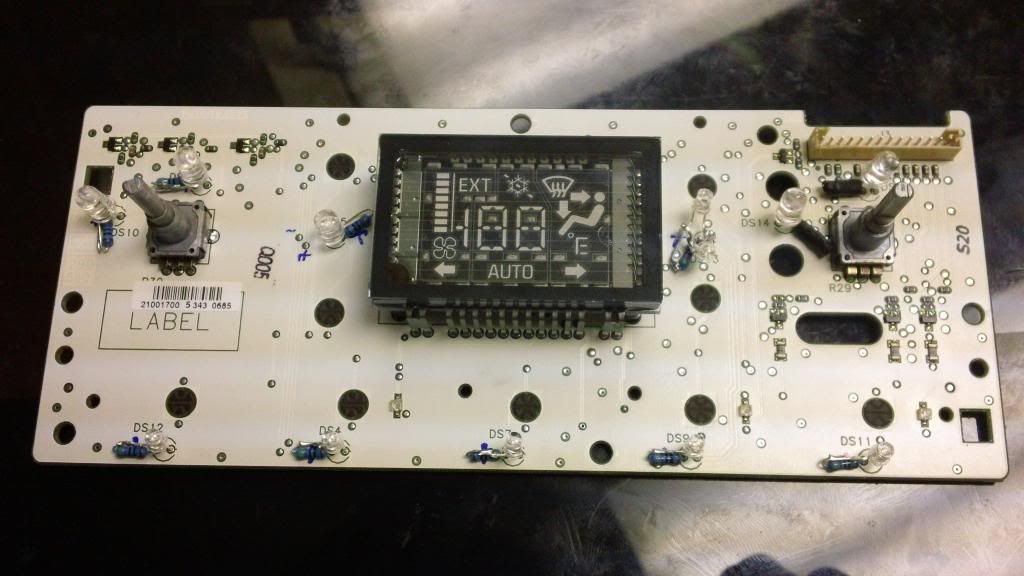
^NOTE: yes those LEDs on the thermostat dial area do not match... the one on the left, is a blue LED. the one on the right, is a white LED. i tried a red LED but the outcome was not as good, trust me. the red also bled into other areas and just did not work well. you will see later down the thread how well it works
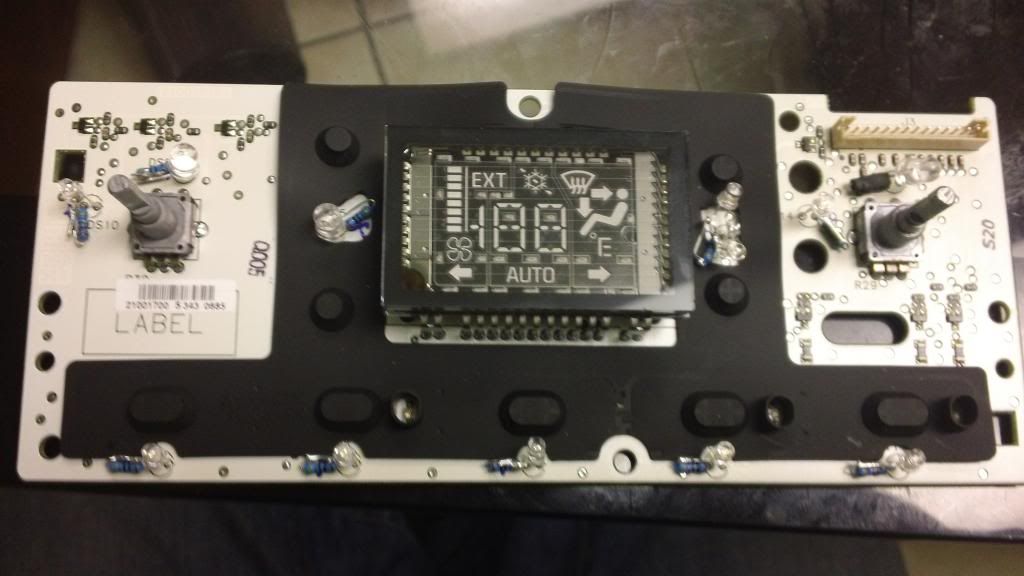
^NOTE: the blue gel film is not shown in the pics, but was added after and is there! i used a film that is slightly less "blue" than others seen on the threads, but i noticed with these films, daytime viewing is very hard since the film darkens the display. our film does NOT darken the display and is perfectly visible in daytime
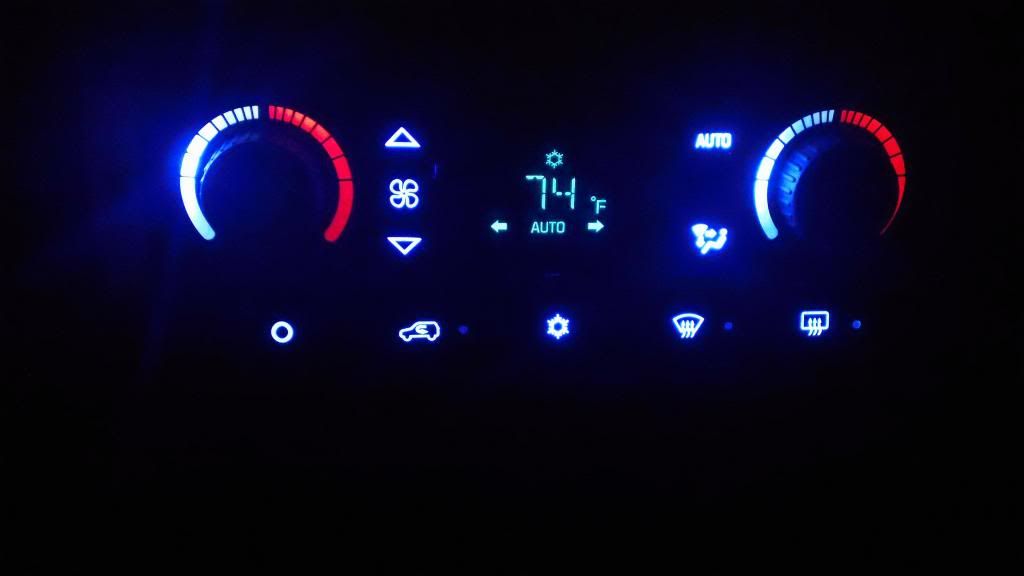
Pictures might make it look like things are "hot spotted" but those who have seen this in person can attest to that being the camera... there are no hot spots, as that was my goal i set out to accomplish and it may have taken a lifetime but they are not there!
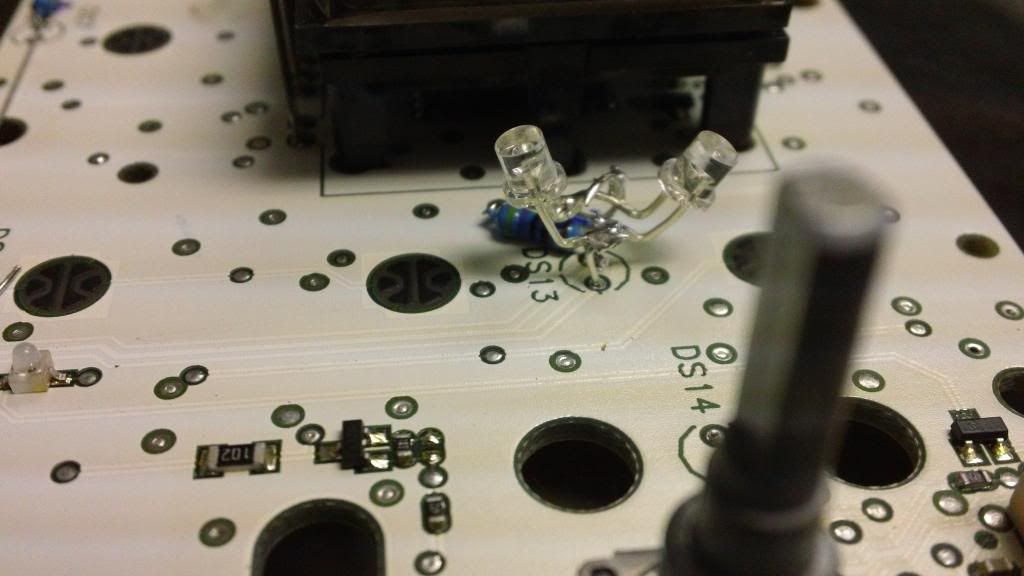
Onstar/Self-Dim Mirror:
^NOTE: the LEDs here are facing towards the board, with the legs pulled back 180 and soldered to the board. the display is on the other side of the board, but the LEDs will NOT fit on that side, so i had them shine THROUGH the board
^NOTE: these mirror lights are NOT on your headlight circuit, these are ALWAYS on as you will notice thats how yours are now... when the mirror self powers/tests, the lights self test, and stay on all the time. this is no big deal, as you cant really see buttons with lights off if you have window tint. the dimmer is all the way down in this pic, hence the dim display for temp/compass (that DOES dim with light circuit)
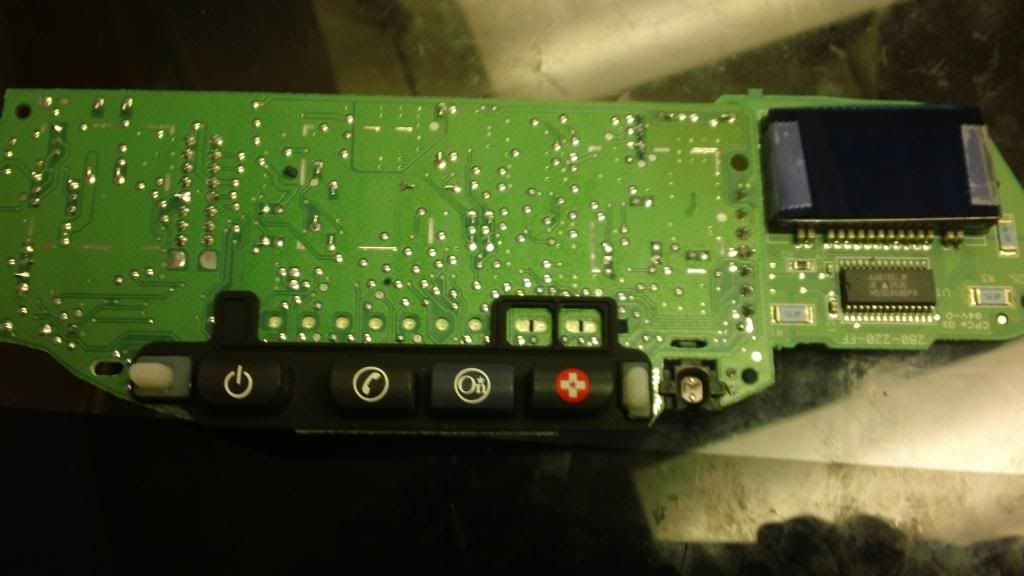
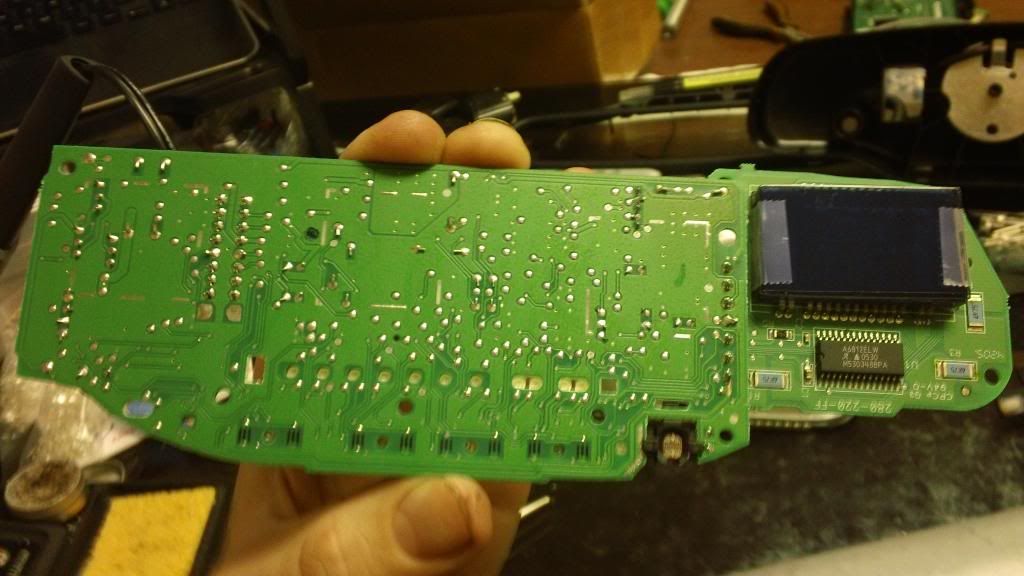
SWC:

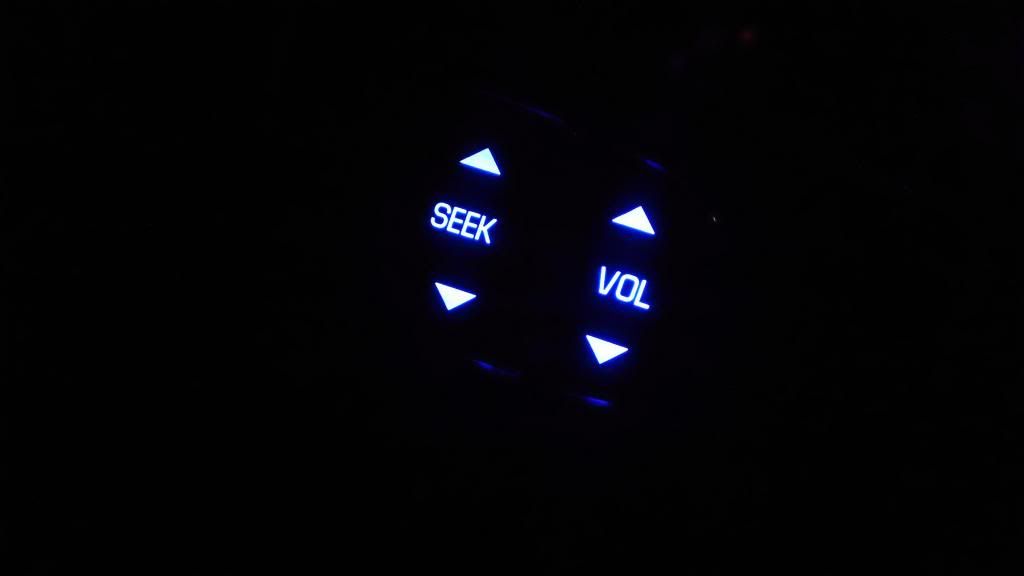
Aeroforce Scan Gauges/Autometer Ultra-Lite w/ Blue LEDs:

more to come in a few, gunna get some food

John
-
looks good to me will
-
SO we are going with a Circle D 278mm HP 2600 stall converter
chris is a good guy over there, and he even has his own "ask chris" button!! what do i have to do to get an "ask john" button??? (or is that what my PM button on here really says and no one told me... that would explain alot ) ive used Circle D before, always had good results and they have a good reputation so i think youll be happy Alex i think it should be an ideal converter for you- nice and tight like a stock converter under light throttle/normal driving but nice kick in the ass under WOT. maybe even some nice smokey AWD burnouts??? (the coolest automotive thing ever ) sorry jason- your gunna have to settle for second place at the track now John
-
thanks for all the kind words guys
i love what i do, i try my best to do a decent job at it Damn dude! Didn't think u would be up all nights after the text at 11 pm lol! Can't wait to get her back now.
Great write up. Learned a lot!

yeah if you cant sleep, might as well be productive!
your going to be a happy camper Solid parts list. You know about the 2-3 shift valve mod?
The only thing I question specially with running a Radix is reinforcing the spline on the input drum with a billet collar.
Also kudos for taking the time to have a detailed internal trans thread for everyone. I know myself this would take a lot of time to do.
yes sir i do, i have a few of those Superior Solutions 2-3 kits here. i was going to throw one in, usually depends on how beat up the valve is in the VB for me
i hear you on the input drum, i just dont see the need on this particular build but its never a bad idea thanks for the compliment, i think if people should read anything (not to mention to try and clear up all this mis-information there is posted on this topic lol) it should be about this. you had a great how to thread btw, im just explaining why they need to do that and use your thread 
It's pretty much exactly that: stock block 3.0"pulley, full exhaust with cats, LT headers, stock j tube with the cai, tune, and for me it's just daily driven with the occasional spirited drive.
And thanks for your honest opinion Johnyeah so i would not recommend spending the money on the shafts for your case
happy to help.just dont come find me if you break an output shaft
Haha yeah. I texted John last night and as i was hitting the send button, i was like "shit. Due to the time change, hes probably asleep. Hope i didnt wake him up." Haha and a minute later he replied "Nope! Not sleeping! Building a trans!" Haha it was close to 2.a.m when he sent me pics of the project. He's a beast.
Haha the bed of my truck looks just like that! Full of driveshafts and a Tcase. My trans is getting built as well. I only hope my builder knows as much as you.. But doubt it. He has been doing scrictly transmission builds and repairs for over 30yrs though. He knows his shit. Only reason im getting it rebuilt is cuz the pump went out. With the shift kit and servos, ive never had a problem with my trans. Like John said, these are essential, as well as maintanence and keeping temps down with a bigger cooler. Ive got the vette servo now, maybe ill have him upgrade it to the sonnax. Will he have to custom grind the shaft for the correct clearances like you had to? He also said there is a 12 pack clutch kit for the 3-4 shift over the stock 5 clutch pack? Is that what you installed in this one? The 8 fullsize clutches and 7steels=15. Maybe thats what he was talking about? Im going to order my PI 2800 triple disc and bring that over to Turbo Tom (the trans guy). Would you recommend upgrading the flex plate? Im still rocking the stock one.
Keep up the good work! Im sure Alex is gonna love the new trans. And talk about customer service! Staying until 2-3am to get a headstart on the build. Thats awesome!
i dunno if id go that far, im sure he knows his shit
but thanks either way the 3-4 clutch pack is a huge failure point on these transmissions, and if you have it out and apart (have to for the pump either way) i would certainly put a few items that are known issues, and arent too expensive. id do, at the minimum- a "beast" sun shell kit, new 2-4 Red band (OE width unless you get a new 2-4 band drum, otherwise it will burn on the edges...), 3-4 clutch pack kit (i like the Alto Red Eagle 8 clutch/7 full size steels- I DO NOT like the Z-Pac :popcorn: for heavily modified heavy trucks like these; those are the one sided friction material 3-4 clutches. yes they are better than OEM, no i dont prefer them for blown heavy trucks. fbody, corvette? absolutely use the Z pack. Other option i like is the Blue Plate Special, Raybestos makes them, and has full-size steel version as well. regardless what you pick- make sure he uses ALL the clutches and full size steels. some builders like to eliminate some clutches/steels for faster spin-up/shift but it takes out of your holding capacity and us truck guys just cant afford that.), change out the three little accumulator pistons on/in the valve body- make sure you have all 3 metal (one or two stock ones are plastic-they crack and leak, then you loose a large amount of fluid pressure on your most important shifts. this fix is less than $20 altogether!), make sure to buy/use the high RPM pump spring (i know PATC sells them... dont recall who makes the spring but its NOT in the shift kit!), Borg Warner 29 element forward sprag (this is prob the #1 or #2 fail point on these transmissions and this part is $30); so those few things (may seem like alot but its maybe $150-200 of parts, majority of that being 3-4 clutch kit...) if you have the trans apart will get it to last much longer and be much more reliable. id go ahead and do that while its out man. it cant hurt and its worth the little bit of money... sounds like your in good hands with this guy which is the biggest part of the trans battle- if its installed wrong, doesnt matter what parts you have!for the servo pin- yes its a tad longer than the stock pin, but sometimes it doesnt need any adjustment. your builder will know what to do, he needs to install it straight up and apply the servo, check to make sure the input shaft/drum spins freely with the servos installed. if it doesnt, the pin is too long and is dragging... this will cause immediate 2-4 band failure. its easy to check and easy to pull back out and grind. im sure hes done this before on modified trans, no big deal
oh and i think the clutches he is referring to for 3-4 is the z pac... its what all those "older" trans builders use (not an insult
that used to be the only thing available for the 4L60e so i think thats why so many of these guys swear by them... but now theres many better options for heavy vehicles like stated above). youll have to ask him, who knows lolfor the flex plate- i put the SFI/heavy duty ones in anything with a 3000 stall or higher typically. but the stockers can crack from time to time, even on bone stock vehicles (last one i had crack was a TBSS 100% stock). if you have the $90 or whatever it is, go ahead and change it. better safe than sorry right? if it cracks, whole thing has to come out just to change it

-
nice looking truck. good move going up in tire size
the 275/55 with a 2/4 will look ALOT better than those little 45 series... youd need to SLAM it and thered still be a decent gap. white always looks awesome on these trucks -
NOTE: i know this is long, but if you read anything- read this thread. its prob some of the most important trans info you will find, all in one place. happy reading
ok here is some more. guess i decided to start tearing into it tonight, wasnt really tired. but damn its FREEZING here (prob warm for most you guys
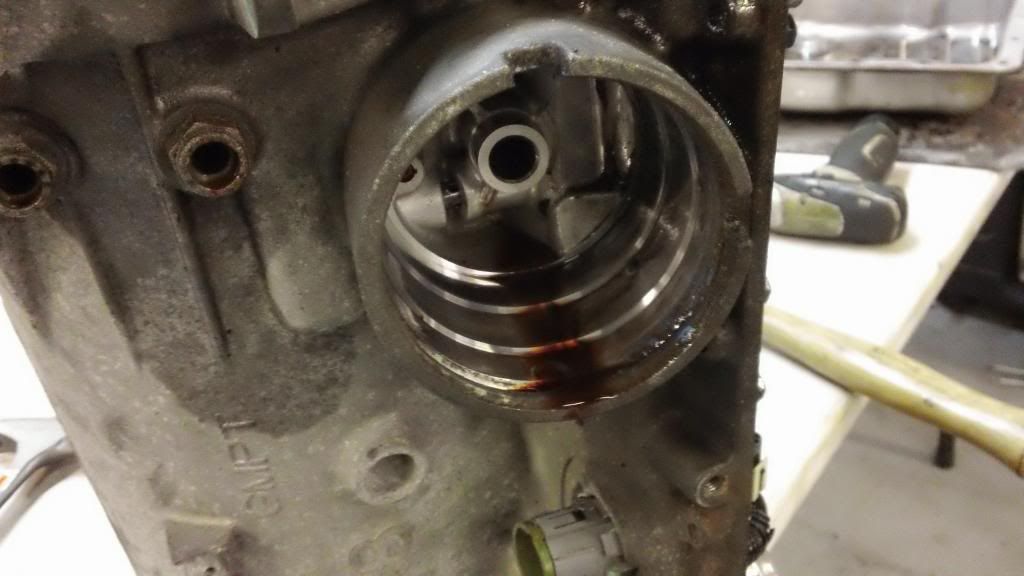
) now im going to go into something i am going to call: "Practicing Safe Shifting!" and kids this is more important than safe sex, i dont give a DAMN what your PE teacher says!!! HE obviously does NOT have a shift kit!! plus, are sloppy shifts more fun? HELL no! is safe sex more fun...? NO! (if someone gets someone pregnant from this, i am hereby not liable LOL) ANYWAYS back on topic- this transmission is a PERFECT example of what WOULD NOT have happened if: 1. a Transgo HD-2 shiftkit were installed when trans was still in good health, 2. the trans fluid was flushed at least every 20k miles (id recommend less since this truck is Magnacharged) with GM or equivalent fluid (no autoparts house brand fluid!) and 3. the vehicle had a proper trans cooler on it. now alex, i am NOT saying this towards you or that you couldve prevented this... you just bought this truck and it was too late even the day you picked it up. this is just a point for people who are modding from stock, and who have healthy transmissions.so lets take a look at his trans fluid, trans filter (this needs to be changed every 50k-60k, or more often it doesnt hurt), and other evidence of why this trans failed. the 4L65e may not be equipped stock to handle these big, powerful trucks but- they arent quite as bad as the wrap they have gotten. its mostly failure from misuse, improper maintenance, or abuse. any trans will fail from those conditions, maybe just not as soon... here is the fluid and what is left in the bottom of the pan-
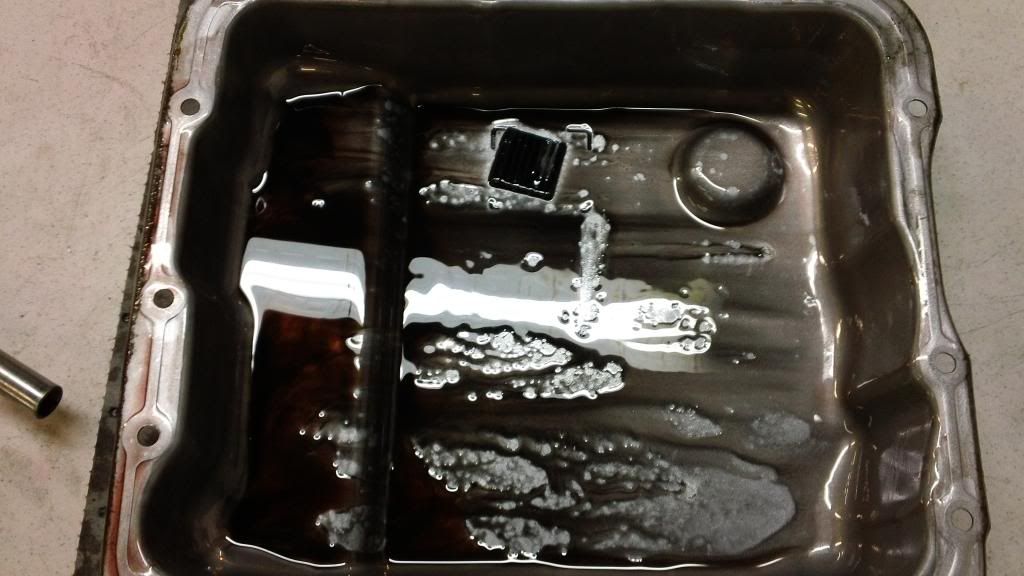
this may look bad, but is about an average amount of metallic sludge for a neglected trans. now this trans did NOT fail catastrophically, but would have in the next 200 miles. basically this is a unit where all the clutch packs and bands are worn all the way down, and metallic sludge has overtaken the fluid, killing its ability to "grip" or cause any friction. there was also fluid all inside the trans vent tube, and dirt build-up around where the vent tube exits- showing signs of overheating, as this truck does NOT have an aftermarket external trans cooler, only the tiny stock one. now lets look at the filter, and see when it was most likely last serviced-
this filter is OEM, the pan gasket was OEM, and very dry rotted and cracked. by the looks of this and the weight of it, it is most likely the ORIGINAL filter! and this truck has 85k miles on it, supercharged miles. when a filter is this old and packed full of debris, it chokes the pump and lowers line pressure and causes inconsistent pressure. this is a mixture for disaster. the moral of this post- go change your fluid, your filter, and make sure you have a shift kit- stock or not. a properly shift-kitted 4L65e will hold over 420-450 WHP, and will do that for nearly 100k miles. it just needs proper maintenance. since i know alex will keep that up from now on, he will never have another huge build thread, at least not one involving his transmission
i just want to post this to show him whats going on but also to make others aware of the simple, cheap, easy things they can do now to avoid all this time consuming, expensive stuff like this... yes his truck has a Radix on it, but no it did not necessarily " need" a built trans one way or the other... if the above 3 things were done, it would be in perfect working order right now. i am happy to help anyone with this info, of what trans coolers are good, where to get the right shift kit, etc. hopefully this info helps someone. and shows what can happen if proper care is not taken of a vehicle... keep in mind what i said too, this isnt about his truck and him not taking care of it- the previous owner did this. i am just using this to show as an example of how easy it is to avoid this and what it will look like when it is neglected. this is very common and i will prob be doing this again in a few weeks with another truck, so im not "bashing" anyone. most people are not mechanics, and unfortunately most dealers and many shops dont really even know the proper way to take care of something like this... then if a dealer does, they dont perform the work you, the customer, pays for! so like i said, dont take this personally because there are MANY factors that can lead to this, and its usually a combination. for all we know, this previous owner DID pay to have his transmission serviced correctly, but the tech "smoked" the job and just either never did it or didnt do it properly. ive seen it all too often... its important to know who is working on your vehicle. its sad thats how people are now, but its true. i see it every day...now back to his build!
maybe we can make a new thread about that with pics and sticky it??? IMO it wouldnt be a bad idea... shift kit and servos is one of the most asked about things on here... mods what do you think?so here is the beginning of the tear down-
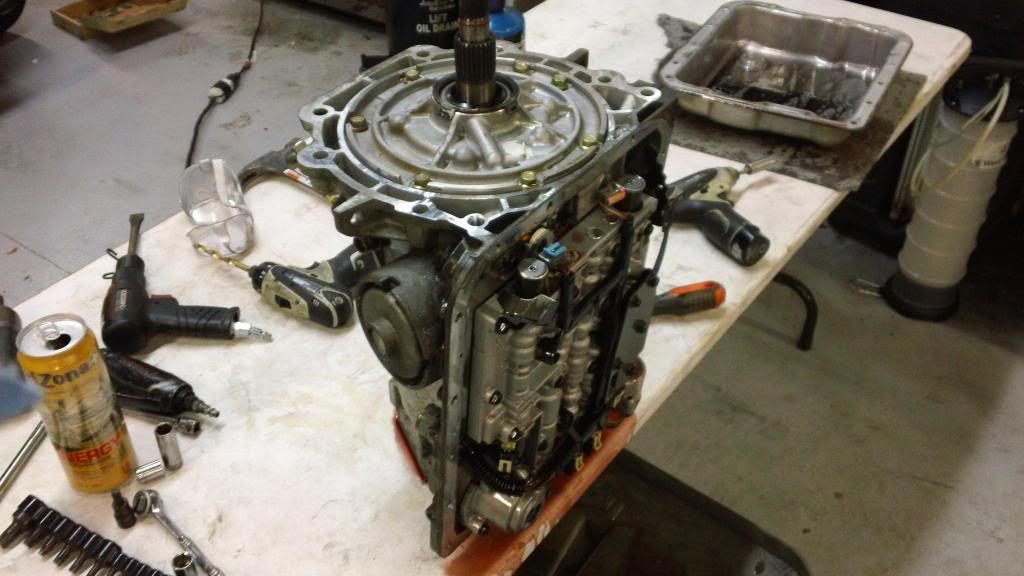
like my custom made table???
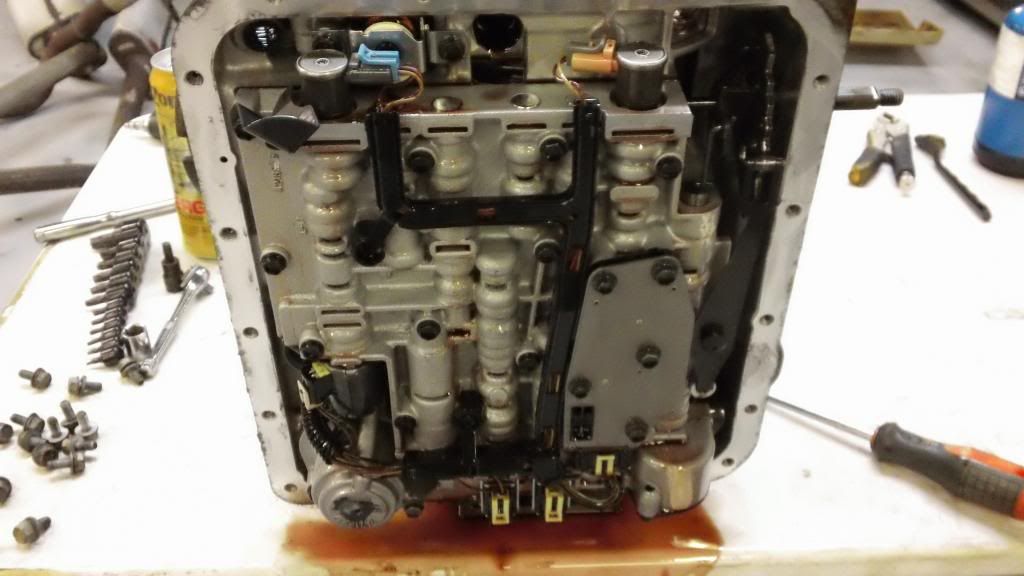
(its got a hole in it!!)here is the case/valve body with pan and filter removed
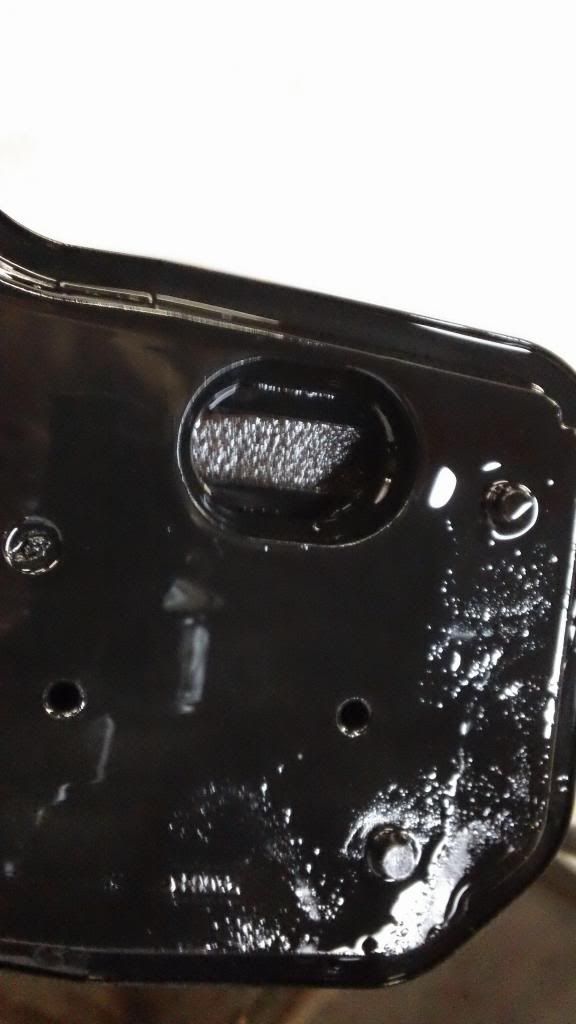
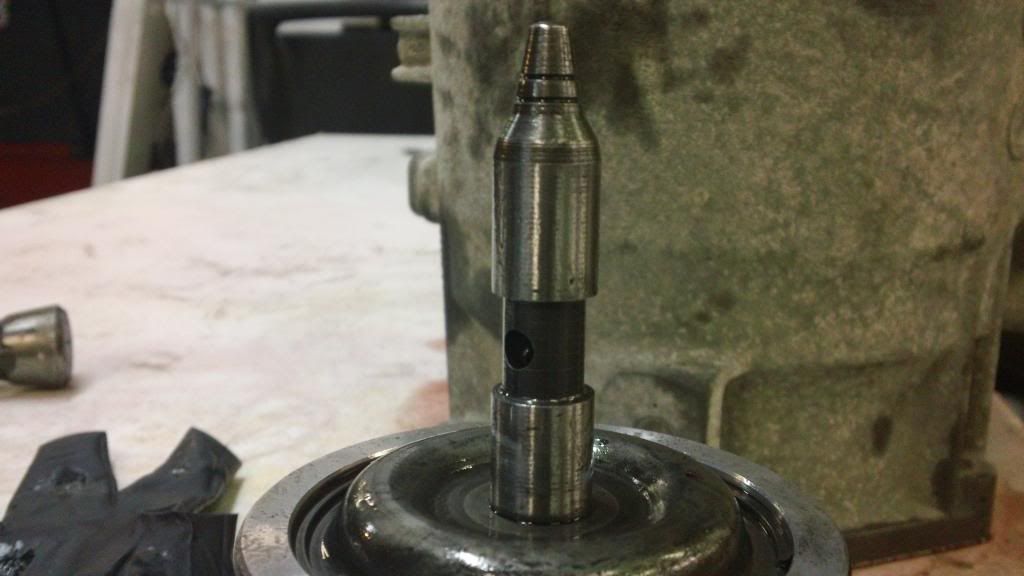
here is where the servos go in the side of the case, with the servo/pin assembly removed
here we will compare the "vette servo" with the stock servo, as i get A LOT of questions about what exactly it is and does-
the one on the left is the vette servo, right is your stock servo. the two identical looking round ones behind the two standing up are the overdrive/4th gear servos, and are identical on the "Vette 4l65e" and your 65e. these do not come with vette servos, as they are not different.
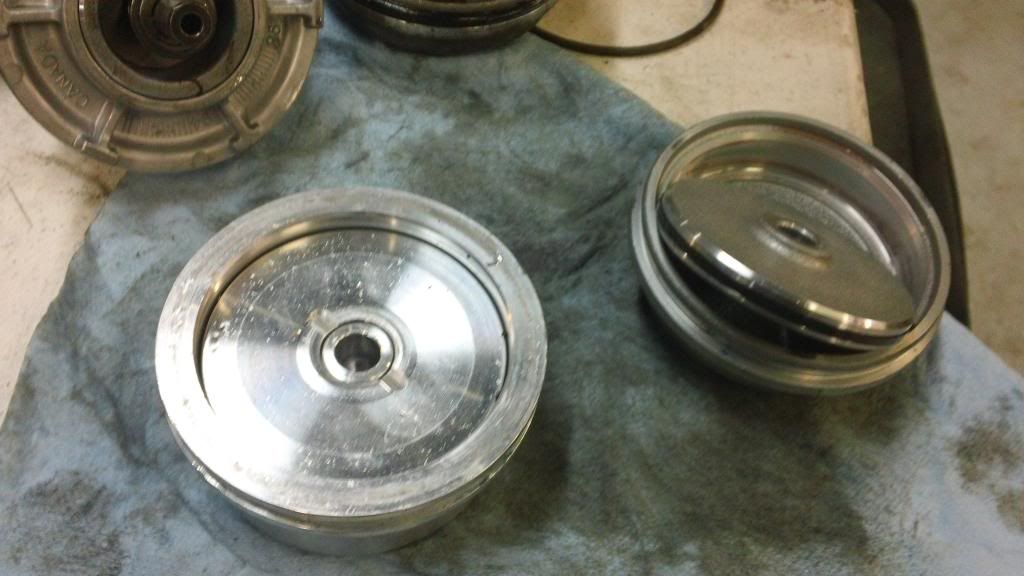
you can see how the center of the vette servo (left) is smaller than the stock servo. this allows the outer part, which is larger (left) to have more physical surface area, thus more fluid apply area. this is how your 1-2 shift happens, fluid fills from a passage into the case behind the servo, and "applies" the servo into the servo pin, which applies into your 2-4 band (which in turn creates your 1-2 shift long story short). SO what does a vette servo do? why are your shifts firmer once installed? that larger area, as clearly seen in this picture, allows more fluid to press onto the servo and pin, thus allowing more "clamping force". this means a firmer, more crisp shift. the 4th gear/OD servo works exactly the same way- and here it is separated-
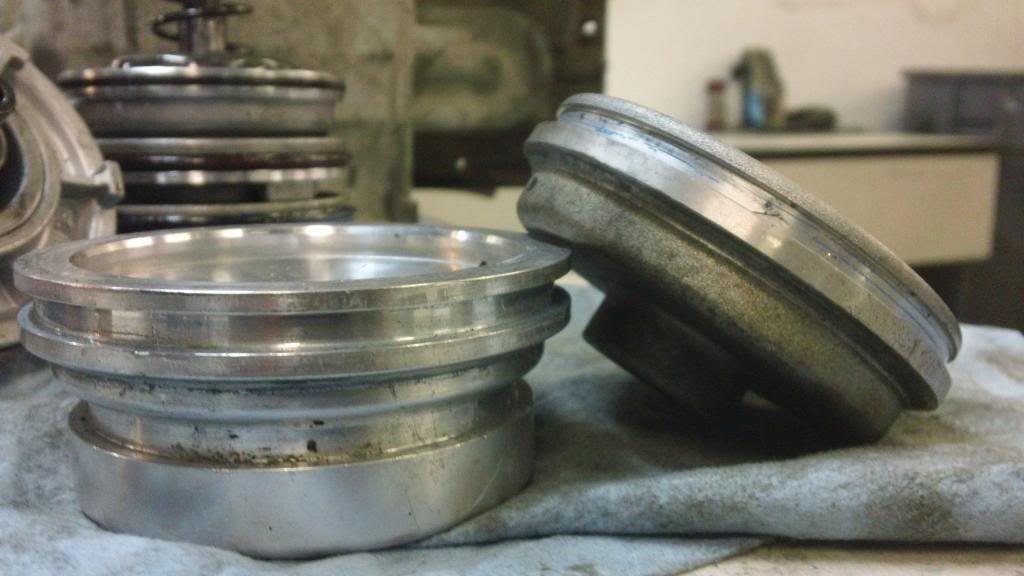
fluid goes in between those two parts, and applies the pin again (hence why its the 2-4 band) in a slightly different manner to gain 4th gear. so how do we get an even firmer, better 1-2 shift and a decent 3-4 shift? Sonnax makes a full servo and pin assembly, that includes an entire new assembly. heres a picture to show just how much larger it really is-
that is the Sonnax servo next to the vette servo. so if the vette servo looked larger than the stock, look how small it looks now! and note that the Sonnax also has a HUGE 4th gear servo. also, something always overlooked is LEAKS. this is a hydraulic system, so fluid pressure and volume are the key to its success and functionality. if you have a leak, it doesnt matter how big the servos are. and this transmission WAS leaking on the intermediate/1-2 servo, causing slippage on the shift which leads to total failure... notice how the Sonnax servo has over twice the seals BOTH stock servos, the vette and the stocker, have. this ensures they NEVER leak. even the pin has seals! you will hear many builders say "no dont use those garbage billet aftermarket servos, GM wouldve used them if they were better". but you be the judge- which one looks better engineered and plain smarter to you? yes the Sonnax servos are more money... are they $2500 like a new tranny? NOPE
this is why i recommend these over the vette servo! i need not explain, the pics tell the whole story!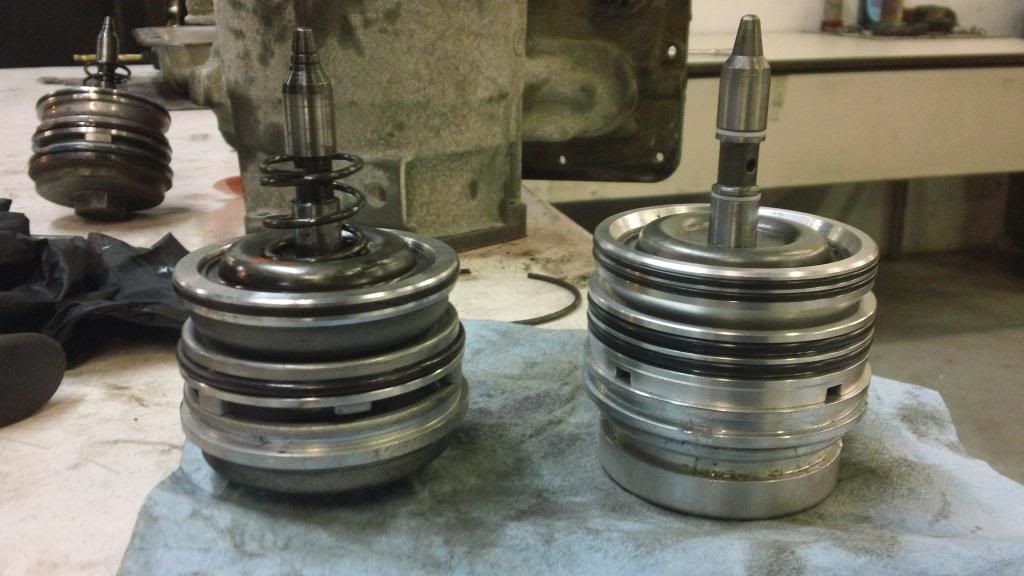
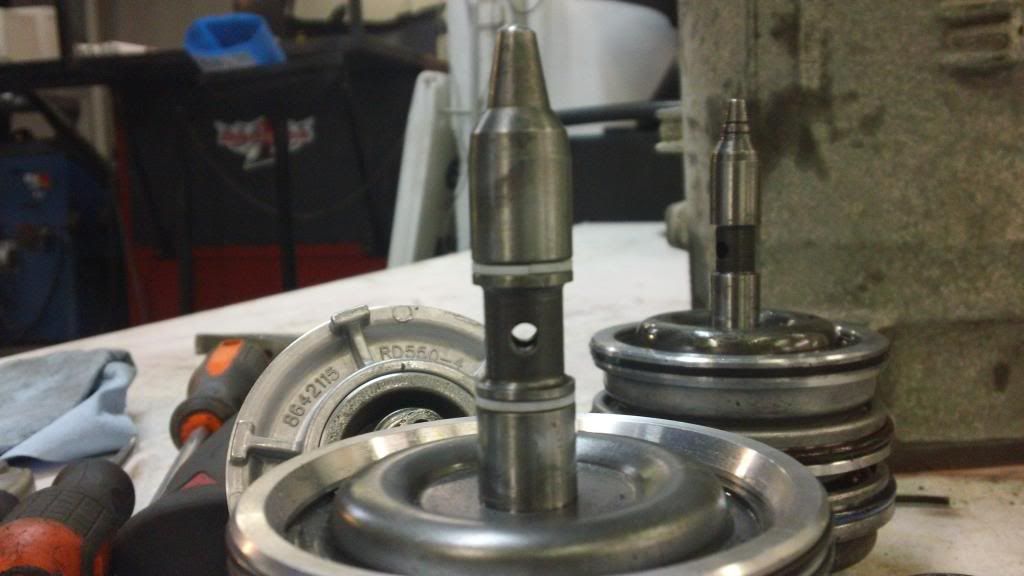
stock 4th/OD servo next to Sonnax OD servo
Sonnax Pin (first pic) vs stock pin (second)- notice the stock pin has no seals, Sonnax has two! its also longer, so it can be custom ground down by your builder for your specific application to get end play exactly where it needs to be for better longevity/better shifts
ok thats all for now, gunna get some sleep. tomorrow we pull the rest apart and see the internals! class dismissed!
John
-
hey wanna know something funny...?
you already had a vette servo
i popped out the servo tonight and was like would ya look at that lol... like i said, it really IS the most common mod -
stock SSS exhausts are pretty hard to come by... most are all hacked up or just plain gone lol. i sold one for over $400 for a stock system not too long ago, so im not sure if this will work but it was a good thought! GL with it
John
-
I have to say you are the most dedicated ASE Tech/LSX specialist Ive ever spoken to. Most mechanics shut down shop exactly at 5pm and call it a day......this post is a true testament to your love for these trucks and vehicles with you working on it at 2am. Great job as always sir. Can't wait to see the finished setup! And that 1700hp big killah just sitting dormant, its a piece of art

thanks andrew. i think of it more as i have insomnia, have no life outside this life
.... so if i cant sleep i get shit done i dunno if i read your post wrong or if i posted wrong. the 1700 whp was referring to the three vehicles in the pic- the SSS, the JGP, and that customers 04' Cobra on the lift in the back
SSS Makover teaser pictures
in Video & Photography
Posted
WOW just WOW! that came out great man, i hope your happy with it. looks like they did it right too now im jealous
  someone has a prettier two tone than me now! like they say, theres always going to be something bigger and better lol
  again, love it, good work . i know how long youd been planning all this and the thought behind it. but its so worth it once you see the final product, im sure your loving it
John