


MattGuppy
-
Posts
45 -
Joined
-
Last visited
Content Type
Profiles
Forums
Events
Gallery
Store
Posts posted by MattGuppy
-
-
Yeah its just a screw and than you'll have to fight all the grime thats stickying it in there but it will come out
-Matt
-
Nice dude, he probabally heard your whine and decided he made a big mistake haha
-Matt
-

At this point I put the harness in truck pulled it everywhere it needed to go ran wires through holes and plugged everything in etc. Now its time to start the truck !! I cranked it over and got a huge backfire... not exactly what I was hoping for and than I remembered that I had switched where I mounted the coil packs but didn't switch their harness so I swapped them and tried again and she roared to life!!! Ran codes and everything was good so I reeved her and heard a horrible horrible sound. So killed the truck and was trying to figure out what happened and I realized that I had been sitting on the fan shroud and it sunk down and was hitting the fan so I just fixed that fired her up again and everything was perfect(can't wait for electric fans). Been driving her since and everything works perfect, tomorrow I'm going to work on finishing the last few things that need to be done, I need to run the MAF and AC plugs from the inside through the cowl and to their respective ports. Than I'm also going to run new wires for the horns, wipers, alarm, cruise control etc which all live in the cowl now plus a few other things that I'll post up than I can take pics, put the dash back together, and show ya'll how it turned out !! For those of you interested in doing this feel free to ask for more pics descriptions etc I have a lot more info just too much to post at one time
-Matt -
Took vacation and than liked it too much so stayed out longer but I'm back now.
Stayed up through the night the day before I left town and finished up the job for the most part.The whole project took a lot of these 2 things, Scotch super 88 and sonic, I really like this tape because it does well with heat and water, thats what its there for.This is the part I imagine a few people might want to know about, for the actual joints what I did was determine what wire lengths I needed and used the truck as a measuring tape. For example all the wires coming from the back of truck along frame where extended the length between the two headlight pins. Its much easier to measure a wire against that 40 times than a actual measuring tape. After I cut the wire length I put 2 3/32nd's heat shrink tubes on the wire and striped both sides. Than I cut ONE WIRE AT A TIME FROM THE HARNESS!!!! This is imperative, it is literally almost impossible to cut through the entire harness and put it back, obvious for most I know. Anyway I cut one wire at a time strip both sides than smash the new wire so their threads intertwine and than twist until I can't anymore, this makes a mechanical connection thats already pretty hard to pull apart. Next just take your soldering iron put it under the wire and melt some rosin core solder into the joint, these are small wires about 18 gauge for most and the flux makes the entire joint saturated almost instantly they are very quick to make. Next just melt the heat shrink into place over the joints and move to the next wire.
 This is what one of the bundles looks like I found that cool see through heat shrink and was like why not I was getting so mind numb from doing such monotonous soldering and wanted something to look at.
 I grouped the wires by twisting them together, I first twisted groups of wires to a plug for example this is to the drivers O2 sensor, than took and twisted a group of wires going somewhere such as drivers side frame.
 These next 2 pictures are as I was grouping up wires by what they do and where they go, It took awhile to find a feasible way to pull the entire harness behind the motor, the wires were all designed to be pulled towards drivers side so it was weird untangaling the factory grouping and making it how I wanted.
 More than a few of us have probably eliminated a few things in our trucks, for example I no longer have any use for any transmission, EGR, or O2 sensor wires so I just cut, labeled, and noted how to find them again in my maintenance record.
 A fishing tape helps run things through the frame, I just used a coat hanger and it was... less than optimal got it done though. I ran a few things through the frame such as this wheel sensor, my negative battery cable and a few others
 I finally got to measuring and finishing parts of the harness, I started at the front of the motor and went back, for this I basically just plugged in the furthest forward plug and worked back, In this picture I started with throttle body cables and worked back through alternator, injectors etc. You can't see it but a lot of things have extra wire and I thought it would be dumb to cut things I didn't need to so the extra is folded, coiled, and taped than the entire bundle is taped again than loomed and taped yet again.
 This is the injector harness for the passenger side
 Once I got some of the simpler connections made I took the entire harness out so it would be easier to work with, this is the entire wiring harness for the truck except for whats in the interior or on the frame coming from the back.
 Taping a bundle
 Extending sensors for ECM
 Harness starting to make more sense
 For the coils I got a aluminum bracket off eBay than I just used the same harness lengths because it was close enough, you'll see the coil on the end is looped. Taped it up to keep everything and place and metal off of metal as these are getting mounted to the body.

 This is how groups going the same way look
 The harness mostly done
 I cut this hole in the truck, it is on the passenger side of the transmission hump, I would follow this design exactly if you are doing anything similar, the wide part is to get the connector through than you push the wire to the skinny part to fit the next big connector through. It worked flawlessly and with the dynomat there I didn't have to worry about damaging my work
 Making spark plug wires is not that fun and I was cold so I jumped in my other car with heat on to warm my hands up and forgot about pictures but I measured and made all the wires to the lengths they needed to be to fit new coil location than mounted the coils up, they now live up above the bell housing. Manual tranny is easy enough to drop to get to them in the rare case I need to.
 -
Post up some before pics (not links to other threads) so we can see before.....during.....after.
That is a great idea!!
Heres a few of the earliest pictures I have. My dad bought the truck new in 2000 than gave it to me when I was old enough and I plan to give it to my kid someday. Its a very sentimental vehicle and I look forward to many more great memories from it.


-Matt
-
Its either that or you grill is throw ing me off. it could be because of you grill being all billet. just looks like you have a big gap around your head light and grill on top. if you put a 05+ hood on a 03-04 front end it will do that also if you put a 03-04 grill on and 05+ front end you will have gaps so I wasn't sure. could just be your grill. look at the gap where your hood meets the grill and headlights.
Check out the picture below we aren't understanding each other haha
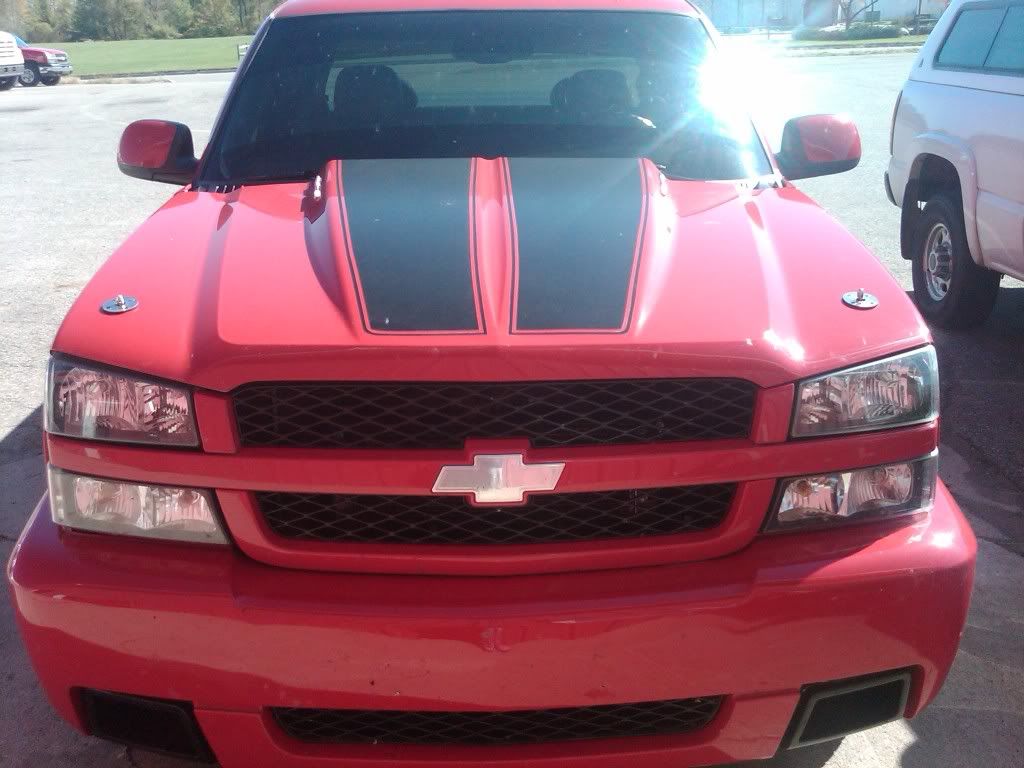
Is that red a factory colour? I really like the colour combo with the stripes.
No its the 3 stage red off the new Stingray, I really like this color its very dynamic, the sun and shadows really highlight the lines of the truck when it hits just right. I appreciate the compliment I think the 2 colors looks great together too. When I was shopping for colors I almost went with a jaguar red and I'm so glad I didn't this color is so much better and I keep GM paint codes for the truck

-Matt
-
What do you mean they don't match? The hood just isn't closed in this picture its only 3 hours or so after I sprayed it
-
Got mine installed and they are awesome
https://www.youtube.com/watch?v=Np4ywTlFhVo&feature=youtu.be
I use one of those new flashers and they work great for me, no resistors is the way to go in my opinion or else you negate the power saving benefit of your LEDs
-Matt
-
Holy bumpers batman
No doubt, those things are ridiculous. You pushing brush with the truck or something?
haha, yeah I used to live in Texas and work on a ranch and I'd go through lots of plants (and sometimes animals because cow).
They are also really great chairs
As far as the pinstripe thank you ! I was still deciding on widths at that point tho so it went away, heres some pics of what I've got so far, I just have the bed to go now.


I put a butt ton (4 coats) of clear on there so you can't feel the stripes at all, tomorrow I'm going to spray the back and than its cut and buff time and hopefully the sun will come out so I can see that sparkle! The black is the black diamond off the CTS-V, the ranch guy I used to work for had one in that color and it is absolutely stunning in the sun
-Matt
-
Its time that I started a build thread, I've always regretted not starting one sooner so avoided doing it and having to back log, but I truly enjoy sharing my work and hopefully helping out or inspiring someone like so many of you have done for me. I'm going to do this a little differently than most. I'm going to continually edit this post and update it with the new topics I start on individual projects so that this will get a long list of quick links for what has been done.
I'll also post as I go in this with random pics progress updates etc
Here we go !!
Relocating ECM/Fuse box to make room for tubs and bigger tires
http://www.silveradoss.com/forums/topic/86748-relocating-fuse-box-ecm-to-inside-the-dash/
Racing stripes through everything
http://www.silveradoss.com/forums/topic/86757-racing-stripes-done-my-way/
Exhaust
http://www.silveradoss.com/forums/topic/87204-welding-up-my-exhaust-lots-of-pics-sounds-amazing/
Engine Bay
http://www.silveradoss.com/forums/topic/87265-engine-bay-make-over-tons-of-pics/
Interior
http://www.silveradoss.com/forums/topic/87276-interior-makeover-from-tan-to-show-truck/
-Matt
-
heres the other topic about strips
http://www.silveradoss.com/forums/index.php?showtopic=65874
heres my strips...flat black..with a 70 chevelle strip... i dont personaly like strips on the bumper or roofs...chevy never did a strip that way so i think thats the most tastefull way of doin it..but some people have different taste..so to each and there own
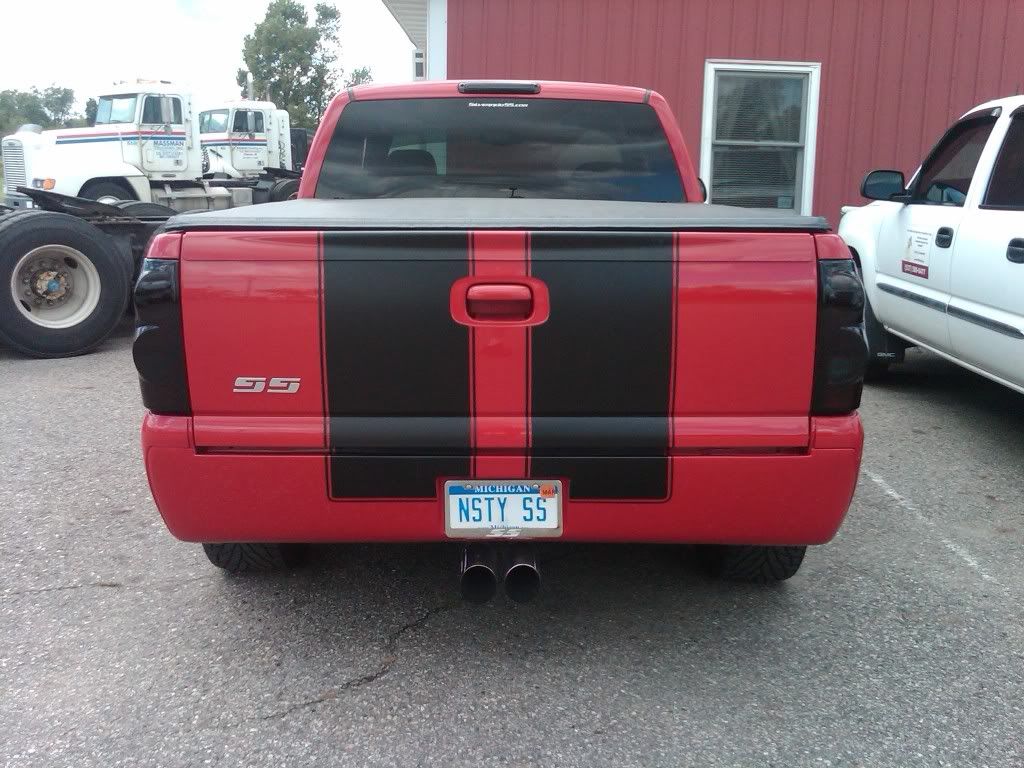
Thanks for the inspiration, I was originally going to ignore the cowl and do stripes the same width the whole way but yours looks so good that I decided I should highlight it like you did, Im going on everything tho unlike you, everyone is different! Your truck is saved on my phone and I kept referencing it as I was laying tape out. If mine turns out half as good as yours I'll be happy.
EDIT: I meant to say awesome plate too, as soon as I saw I checked to make sure you hadn't taken it from my state already because I want it haha
Check out my process here
http://www.silveradoss.com/forums/topic/86757-racing-stripes-done-my-way/
-Matt
-
I appreciate the compliments everyone, Its awesome being on the productive and positive side of the internet stay awesome everyone!!
As much as I plan and account for things theres one variable I always forget about... ME
I get thee urges sometimes when I feel like a idea so good it has to be executed right then, so on that note the truck currently has no transmission, no ECM, and I decided that considering all that now would be a good time to do racing stripes, check it out here
http://www.silveradoss.com/forums/topic/86757-racing-stripes-done-my-way/
-Matt
-
Its time! I'm doing the racing stripes on Nichloe this week, heres what I've got so far.


I want it to look like there is a slice of black truck where the stripes are, everywhere in that line turns black no matter what it is. I'll post up pics as I get
the paint on it and than how it looks cut and buffed!
-Matt
-
I'd like to hear too as I'm also having some... unique problems
-Matt
-
Its a 01 SS clone extended cab, didn't always have the stick but I fixed that

-
Its where the factory radio used to be, I have an iPad there now. I'll be able to slide the iPad out and get to the fuses.

-Matt
-
I appreciate it, I'll be sure to take some pics of it once its empty in there
-
Yesterday I was under the truck finishing up the wiring for my A4 to M5 swap and without the transmission in I finally found a good spot to route all the wires from the engine bay into the interior. My plan is to have only the motor in the engine bay with everything else shaved or tucked so obviously the fusebox and ecm had to go. I'm pulling the engine harness along with everything else back behind the motor and than I'm going to bring it all up into the truck right in front of the shifter hole.
I sat there and thought about everything for awhile trying to make sure I wasn't about to do it wrong but than I decided screw it and just started cutting into stuff. I started with the harness that already comes from the interior I'm about 80% done with extending it I've got all the plugs it has extended except the big one. Several months ago I move my cruise, alarm, and horns into the wiper cowl so I already had that one extended. I'm going to pull the entire harness into the truck and than drill a hole into the wiper cowl to pass the cruise and all those wires back.
I have a iPad mounted in my dash so I'm going to tuck the fuse box behind where its mounted so that I can just remove the iPad to get to fuses.
The ECM is pretty perfect, there is a spot behind the glove box that fits the pocket of the ECM absolutely perfectly no cutting required.
I'm going to post as much information and pictures as I can because while searching for how to do this I couldn't find much more than people saying how bad it sucks and pictures of it completed.
Last night I was pretty focused and didn't take many pictures but heres a few of the harnesses I made 250 feet of wire later.

And here is the fuse box location
I'm going to be spending all of Tuesday working on this so i'll take a lot of pictures
-Matt
SS frame finally powder coated after only 2 years.
in General SS
Posted
Agreed looks great, i'm very jealous of your frame its going to look great for years and years. Throw some wax on it to make it easier to clean for awhile!
-Matt